TAB key
or the  button.
Arttista is a 2D vector illustration and animation software that operates under a frame-by-frame animation paradigm, combined with advanced interpolation features, a bone system, and non-destructive drawing tools. Being vector-based, all deformations, textures, and strokes remain editable at any time, even after an animation is finalized. The central characteristic of its animation workflow is that the artist works by defining states on specific frames and, when desired, asks Arttista to calculate the intermediate states through interpolation.
💡 Tip
An important point in Arttista is the distinction between a keyframe as a pose/state marker and the actual frame-by-frame animation present in each frame. Removing a keyframe is not equivalent to deleting the entire consolidated animation for that section. Keyframes serve to mark a pose/state before interpolation. So, removing a keyframe does not remove the animation. It remains saved/recorded in the normal frames. Arttista uses Keyframes to know from where to where it should interpolate, interpreting them as poses.
The software operates under two main modes for interacting with the scene:
Toggle between modes using the TAB key
or the button.
Arttista automatically records any change in position, shape, or points of an object in the current frame of the timeline. These changes are indicated by a highlighted green area on the timeline, associating the object’s state with time (frame).
Keyframes act as pose/position markers. The frame-by-frame recording already persists the data. That is, the animation is present in each normal frame.
Removing a keyframe does not necessarily eliminate the already consolidated frame-by-frame animation, providing flexibility in timeline editing.
Groups in Arttista are a tool for organizing and, primarily, facilitating the selection of points and objects.
They allow you to create custom sets of elements that can be quickly selected later, even when these elements are scattered across different objects or regions of the scene.
A Group does not alter the points that belong to it. It functions as a set indicator, allowing you to identify and re-select that set of elements when needed.
Groups are especially useful because, in Edit Mode, Arttista’s shapes and objects are open for editing.
In complex scenes, this can make selecting specific points or objects difficult.
For example, imagine a character composed of several different objects. You might need to select some specific points scattered across the scene, but not necessarily all points of an object.
It is in this type of situation that Groups become particularly useful.
A Group allows you to transform a complex selection into a reusable set.
To create a Group:
Select the desired points and objects.
The selection can contain points from different objects.
The selection can be fragmented and does not need to form a continuous region.
Press Ctrl + G.
Arttista will create a new Group containing the current selection.
One of the most important characteristics of Groups is that the selection does not need to be continuous.
You can select different parts of different objects and combine them into a single Group.
For example, imagine a character containing a head, eyes, and a nose.
You could create a selection like:
Character
│
├── Head
│   └── 1 contour point
│
├── Eye
│   └── 2 contour points
│
└── Nose
    ├── Full contour
    └── All internal objects
This selection can be completely fragmented, yet it can still be turned into a single Group.
By pressing:
Ctrl + G
Arttista creates a Group containing exactly those selected elements.
Without Groups, a complex selection like this would need to be manually recreated every time you wanted to work with those same elements again.
With a Group, the set can be identified and re-selected easily.
This is particularly useful for elements that:
are scattered across the scene;
belong to different objects;
have only some points selected;
are difficult to select manually;
need to be selected frequently during editing.
Tip: Think of a Group as a way to give a name and identity to a complex selection.
Groups can be managed through the Groups tab in Arttista.
The Groups widget works like a hierarchical tree, allowing you to visualize and organize groups.
The Groups tab is located on the right side of the Arttista interface.
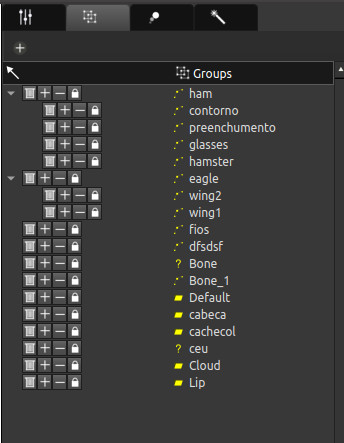
Groups can be organized hierarchically.
This means a Group can contain or be organized within another Group.
This possibility allows for more complex organizational structures.
For example:
Character
│
├── Head
│   ├── Eyes
│   ├── Nose
│   └── Mouth
│
└── Body
    ├── Arms
    └── Legs
This structure facilitates the organization of large projects and allows representing relationships between different sets of elements.
In the Groups tab, you can manage existing groups.
You can:
view Groups;
organize Groups hierarchically;
nest Groups;
remove Groups;
add points to a Group;
remove points from a Group;
lock points belonging to a Group.
In the Groups tab, you can add new points to an existing Group.
This allows you to modify a Group after it has been created.
For example, if you realize a selection should include a few more points, you don’t need to create a completely new Group.
You can add those points to the existing Group.
You can also remove points from a Group through the Groups tab.
This allows you to adjust the set of elements associated with the Group as the project evolves.
Thus, a Group does not need to remain with exactly the same points it had at the time of its creation.
A Group can be removed through the Groups tab.
Important: Removing a Group does not remove the points that belonged to it.
Only the Group is removed.
The points and objects continue to exist normally in the scene.
This happens because the Group is not the owner of the points. It functions as a set indicator, used to organize and select elements.
Remove Group
       ↓
Removes the set/indicator
       ↓
Points continue to exist
       ↓
Objects continue to exist
Therefore, removing a Group is an organizational and selection operation, not a deletion operation for scene elements.
Groups can also be used to protect their points from changes.
In the Groups tab, use the Group’s Lock button.
When a Group is locked:
all points belonging to the Group become locked.
These points can no longer be modified while locked.
This can be useful when you have finished a part of the construction or animation and want to avoid accidental changes.
Caution: The Lock acts on the points belonging to the Group. Locking a Group does not mean deleting, hiding, or removing its elements.
A useful way to understand Groups is to think of them as reusable sets of points and objects.
The original selection can be extremely complex:
Object A → some points
Object B → some points
Object C → all points
Object D → some points
Even so, all these elements can belong to the same Group.
Subsequently, the Group allows you to work with this set again without needing to manually rebuild the selection.
Groups are particularly useful in character creation.
A character can have dozens or hundreds of points distributed across various objects.
You can create Groups to represent important parts of the character.
For example:
Character
│
├── Head
│   ├── Eyes
│   ├── Nose
│   └── Mouth
│
├── Left Arm
├── Right Arm
├── Left Leg
└── Right Leg
These Groups can later be used to facilitate selection, editing, and organization of the character.
Groups are also important during the animation process.
When a part of the animation requires the selection of specific points, you can create a Group containing those points.
This allows you to quickly recover the same selection during different stages of work.
For example, a Group might contain the points needed to modify a certain part of the character’s face.
Instead of manually locating all these points again, simply use the corresponding Group.
Create a Group when:
a selection contains many points;
points are scattered across different objects;
the selection is not continuous;
some points of an object need to be selected, but not all;
certain elements need to be selected frequently;
a selection is difficult to recreate manually;
you want to organize elements of a character;
you want to protect certain points using Lock.
Imagine you are working on a character’s face.
You want to select:
1 point from the head’s contour;
2 points from an eye’s contour;
the entire nose contour;
all internal objects of the nose.
These elements are spread across different objects and do not form a continuous selection.
Select all desired points and objects.
The selection can be fragmented.
Press:
Ctrl + G
Arttista will create a Group with the current selection.
Open the tab:
Groups
The new Group will appear in the Groups tree.
If necessary, add or remove points from the Group.
If you don’t want these points to be changed accidentally, use the Lock button.
If necessary, organize the Group within the Group hierarchy.
To create and organize a Group:
1. Select the desired points and objects.
2. The selection can be fragmented and include elements
from different objects.
3. Press Ctrl + G.
4. Open the Groups tab to view the new
Group.
5. Add or remove points as needed.
6. Organize or nest the Group in the hierarchy.
7. Use Lock to lock the points
belonging to the Group, when necessary.
A Group is an organized set of points and objects used primarily to facilitate their selection and management.
No. You can select only some points of an object and combine them with points from other objects.
No. The selection can be completely fragmented.
Yes. A Group can gather selected points from different objects.
Make the desired selection and press Ctrl + G.
In the Groups tab, located on the right side of Arttista, within the top TabBar.
Yes. The Groups widget works like a tree and allows you to organize and nest Groups hierarchically.
Yes. This can be done through the Groups tab.
Yes. Points can be removed from the Group through the Groups tab.
Only the Group is removed.
The points and objects that belonged to the Group continue to exist in the scene.
No. A Group acts as a set indicator. Removing the Group does not remove the associated points or objects.
All points belonging to the Group become Locked and cannot be modified while locked.
Yes. Groups are especially useful for organizing and selecting parts of complex characters.
Yes. Groups can facilitate the selection of specific sets of points during animation.
No.
Groups are primarily used to organize and facilitate the selection of points and objects.
Tracks are used to organize groups of keyframes and related points within the timeline, but they always have a group created with the same name as the track, which Arttista uses to “store” which points belong to that track.
Groups are one of Arttista’s main organization and selection tools.
Their primary goal is not simply to organize objects in a hierarchical structure, but to allow complex selections of points and objects to be transformed into reusable sets.
A Group can contain:
individual points;
points from different objects;
objects;
fragmented selections;
complex sets of elements.
Groups can be:
created with Ctrl + G;
viewed in the Groups tab;
organized hierarchically;
nested within other Groups;
modified by adding or removing points;
removed without deleting scene elements;
locked via Lock.
Key Concept: A Group is not the object or points it represents. It is a set/indicator that allows you to organize, identify, select, and protect those elements.
Groups are used in various parts of the Arttista workflow and become especially important in complex projects, such as detailed characters and animations with many points and objects.
ℹ️ Tip Shortcut:
CTRL+1
Creates shapes by inserting a new vector point with each mouse click. This is the default tool for drawing objects with or without fill, as well as everything that can be drawn within Arttista.
Has automatic painting dynamics enabled by default when using a mouse and pressure-sensitive dynamics when used with a pen or graphics tablet. When using a mouse, the dynamics (point size, texture rotation, position and size noise) are controlled by sliders in the graphical interface that edits the Point Click Pen tool. In these sliders and controls, you can set how this dynamics will occur.
To finish drawing the current shape, you can press
ESC or the right mouse button. This ends the drawing of the
currently being drawn shape.
When you start drawing with this Tool, you can use an assistant
that allows you to set the control points of the curve for the point
being inserted into the current curve. To do this, hold down the
SHIFT key before clicking to add the point. As soon as you
click, while still holding SHIFT and the mouse button down,
moving the mouse will modify the control points of this last point’s
curve, giving more precision to the drawing. If you release the mouse
button or the SHIFT key, this assistant ends the editing,
and you are back to continuing to draw the object.
Up to the current version, 2.7.1, you will find 3 more drawing assistants. As soon as you start drawing, right after adding the first point of the object, a panel with 3 options opens in the upper right corner of the Arttista drawing area. They can be activated by click or shortcut key. These assistants are:
| Assistant | Function | Shortcut |
|---|---|---|
| Semicircle | Immediately adds a semicircle to the object being drawn | Alt + 1 |
| Half Quad | Immediately adds half of a square to the object being drawn | Alt + 2 |
| Rounded Corner | Immediately adds a rounded corner to the object being drawn | Alt + 3 |
💡 Tip
All these assistants have creation stages. For example, for the Half Quad assistant, once you activate it, a perfect half-square appears in the shape. When you move the mouse at this moment, this entire square moves with the mouse while still belonging to the shape. Once you give the next click, the assistant moves to the second stage, which is to change the up-down orientation while you move the mouse. In the next clicks, it reaches other editing/assistance stages, and when it reaches the end, you are free to continue drawing the object. Should it be necessary or desired to end the stages before the final stage, it is possible with the right mouse button or simply by pressing
ESC. All 3 assistants have useful stages.
Ctrl +
J. They will form a single object. How they join
depends on their arrangement in the drawing area. If one object’s last
point is near the first point of the other selected object, it is
possible that the union happens there, and so on.ℹ️ Tip Shortcut:
CTRL+4
Allows freehand drawing, with the same properties as the Point Click Pen, with the difference that points are inserted while drawing.
Here, assistants and tools behave differently and have different functions. Some are automatic while you draw freely. This assistant is:
| Assistant | Function |
|---|---|
| Spacer | Maintains a minimum distance in pixels between the points being drawn on the screen |
The Spacer can be configured in the Arttista preferences window under the General tab.
Other assistants are only executed after finishing drawing the object. They are:
| Assistant | Function |
|---|---|
| Smoother | Smoothes the drawing of all curves of the newly drawn object |
| Simplifier | Reduces the number of points of the entire newly drawn object without compromising its shape |
All these spacers mentioned above can also be configured in Arttista under the General tab.
ℹ️ Tip Shortcut:
CTRL+2
A click-based drawing tool, but unlike the pens, it is more geared towards texturization, shading, and internal painting. Although it is often used to draw filled shapes as well, because even objects drawn with the brush can be configured to have a fill, thus forming a filled object identical to a filled object drawn with a pen.
Below is a list of the fundamental differences between objects drawn with a pen and objects drawn with brushes:
| Pen | Brushes |
|---|---|
| Objects drawn with a pen cannot be inserted inside other objects | Objects drawn with a brush can be inserted inside other objects |
| With the pen, you can draw without using any texture, just using the pen’s solid color | It is not possible to paint with brushes without using a texture |
An object made with a brush can be added to another object made with a pen, becoming part of the interior of the pen object. In this way, the object made with the pen becomes a mask for the other object. This does not mean that just because it is a mask, it will not have an outline or a fill color. In fact, it will still be a complete object that will now house inside it the object drawn with the brush. The same applies to eraser-type objects that can be inserted inside an object made with the pen. Pen objects can house other objects or not.
💡 Tip
- If you have already drawn an object with the pen and have already drawn one with the brush and want to unite them, simply select them and press
CTRL+J.- If you have already drawn an object with the pen and are going to start painting and would like the pen object to immediately become your painting mask, you can double-click on any point of the pen object. This will select it completely. Then, exit edit mode and start painting. You will notice that you are painting only inside the object made with the pen.
- The same brush-made object can belong to one or more pen objects. Simply select them all and press
CTRL+J.
ℹ️ Tip Shortcut:
CTRL+5
Similar to the Point Click Brush, but here, the drawing is done freehand, which means it will have the same assistants as the Freehand Pen, i.e., assistants that happen while drawing and assistants that happen after drawing. If the drawing is being done with a mouse, the dynamics regarding point size, transparency, texture rotation, rotation, and position noise will all be done automatically and configurable in the Free Hand Brush control panel. However, if the drawing is being done with a digital pen or graphics tablet, the dynamics are entirely controlled by the pressure level.
A tool designed to give a more natural finish to vector drawings. It was developed to simulate the effect of a Raster editor’s eraser, but in reality, it is a brush that instead of painting, erases. Therefore, objects made with the eraser inherit the same properties as the brush object, such as texture, dynamics, and colors. Like brushes, they can be inserted into objects drawn with the Pen tool, being able to erase the interior of those objects. But they can also be drawn outside, erasing the drawing as a whole. Additionally, they can have a fill color, making the object drawn with this tool a large area that erases everything within it.
💡 Tip The eraser does not erase the shapes or points of vector shapes. The points are always still there. What it erases are the resulting pixels of vector drawings, as if you had exported this drawing to a Raster software and used an eraser there. But the eraser is non-destructive. If you alter the points drawn with the eraser, your vector drawing is still there. This makes the eraser extremely powerful.
An advanced tool for manipulating vector shapes based on collision.
This is what many 3D software call a sculpting tool. Up to version
2.7.1, the only existing form for sculpting is a
circle. Therefore, when activating this tool, a circular area is drawn
around the mouse. The size of this circular area is configurable in the
tool’s control panel or by holding ALT and scrolling the
mouse wheel.
An essential tool for optimizing vectors, reducing point count while maintaining geometric fidelity, ideal for illustration and animation workflows.
Smooth Objects Before Simplify: Smoothes the stroke before simplifying.
Simplification Times: Number of simplification cycles applied automatically upon finishing a stroke.
💡 Tip Reversal:
CTRL+Zundoes simplification levels successively, restoring points removed by the algorithm. Therefore, if you set simplification to 4X after finishing a stroke, eachCTRL+Zundoes 1X. So after pressingCTRL+Z4 times, you will have the stroke you originally drew without any simplification.
Allows you to resume drawing finalized shapes or paths, emulating the behavior of manual drawing and expanding existing geometries from their endpoints.
SHIFT key.Note: If the
SHIFTkey is released during the process, the continuity function is deactivated. The feature is compatible with both geometric shapes (open or closed paths) and Brush strokes.
A tool introduced to optimize the manipulation of curve segments, allowing for precise transition between curved and linear paths.
Shift + L: Direct conversion to a
straight line. Select two or more points of an object, and the curve
between them instantly becomes straight.L (held down): Incremental linear
smoothing. Continuously reduces the curvature while the key is held
down, without fully converting to an absolute straight line.Allows real-time alteration of the curve being drawn with the Point
Click Pen or Point Click Brush. To activate it, simply press the
L key while you draw. At this moment, you
can observe that the more times you press
L, the straighter the curve between the
last point of your drawing and the current mouse position becomes. This
allows you to make a real-time edit intending to make the curve
straighter even without having finished the drawing.
After application, the resulting geometry remains fully editable. Individual control points can be manually adjusted at any time.
SHIFT + double-click: Selects the
object and its sub-objects (children). These sub-objects are objects
drawn with Brush and Eraser that were added or made directly inside
other objects.CTRL + click: Adds the point under the
mouse cursor to the selection.CTRL + A: Selects all
objects in the scene, except those invisible in the current frame or
other frames.SHIFT + CTRL +
A: Selects all objects in the scene, including
objects that are invisible in the current frame or other frames.💡 Tip: It is also possible to select by creating a rectangular selection area by initially clicking on a point in the scene that contains no points and dragging to another final position. This will create a rectangular selection area, and upon releasing the mouse button, all objects and points selected there will become part of the selection.
Below are the modes in which selection can function:
| Mode | Description |
|---|---|
Pointer SHIFT + 1 |
This is the default selection mode. You select with the mouse pointer. Can also be activated via the indicated shortcut key or in the selection mode panel. |
Circular Area SHIFT +
2 |
In this mode, a circular area opens around the mouse cursor, and
wherever you move the mouse, all points within it are added to the
selection. To deselect all selected points, you can press
ESC, but if you want to deselect only some of them, you
should hold the SHIFT key and move the mouse over them to
remove them from the selection. Clicking the mouse on an empty area also
removes all points from the selection. But in this mode, you cannot move
points, only select them. |
Circular Area with Movement SHIFT +
3 |
Similar to the mode above, with the difference that once you click and hold down the mouse button and the points within are selected, the moment you move the mouse, the selected points will also move. This mode was designed for cases where you already have the desired objects or points under the circular area around the mouse and want to select them and start moving them immediately. |
💡 Tip: In both circular modes, to increase or decrease the radius of the selection circle around the mouse, you can change it in the selection tool panel or hold down the
ALTkey and scroll the mouse wheel.
An advanced editing feature that isolates the selection, allowing you to manipulate points or objects in a specific area without interference from adjacent or overlapping elements.
Activation: Spotlight button in the tools interface (in some workflows, you can also hold ALT and double-click on any point of the object).
After selection, only the points isolated by Spotlight become available for editing and transformation.
A specific icon is displayed on the screen indicating that the selection restriction is active.
If no object is selected before activation, Spotlight will allow you to draw and edit without worrying about all previously made objects and points. This is because Arttista understands that in this case, you want to give Spotlight to the new points you are yet to draw. In this way, it leaves everything drawn up to that point in a “Locked” state. Recommended use cases: scenes with many overlapping objects (high point density), detailed editing of specific parts while maintaining the integrity of the rest of the composition, and creating masks/localized painting areas (e.g., light and shadow touch-ups without altering the entire already painted structure).
👀 Curiosity: when you activate Spotlight mode, Arttista actually does not highlight those previously selected points. What it does is create a group called Spotlight, add to that group the inverse of everything you did not select, and finally, “Lock” that group. This is so explicit that you can observe a group called Spotlight in Arttista’s groups tab as soon as this mode is activated. When the mode is deactivated, this group disappears, and all those points become “unlocked” again.
Below are keyboard shortcuts for operations on transforming points and objects in the scene. Each of these shortcuts will modify properties of the currently selected points on the screen. Therefore, when you press them on the keyboard, only the current selection of points + objects will be affected.
+
(increase) and − (decrease).Ctrl + + or
Ctrl + −.* and Ctrl +
*: Rotates the brush texture (and reverse
direction) — mainly used with texture brushes (e.g., Fur).R key.S
key.X
key.Y
key.Shift + X allows scaling a
selection horizontally without changing the stroke
thickness (outline) of the shapes.Shift + Y allows scaling a
selection vertically without changing the stroke
thickness (outline) of the shapes.Ctrl + E: Opens/closes
the path of the selected object(s).Ctrl + O:
Activates/deactivates fill for the selected object(s).Ctrl + K:
Activates/deactivates manual control of the control points for the
selected points. If deactivated, the curve between points returns to the
automatically calculated mode.Central command for unifying structures in Arttista, with multiple uses depending on the context:
CTRL + J.A powerful tool for organizing and manipulating groups of points, optimizing the animation and editing workflow. A Staple essentially represents a group of points. Clicking on a Staple is the same as clicking on a group in the groups tab. Staples were created in Arttista to facilitate the selection of objects and points in complete scenes. You could, for example, have a Staple that, when clicked, selects the entire head. But you can have a Staple that, when clicked, selects only the eyes. Another Staple for the pupils, and so on. Staples can represent any points, whether from the same object or different objects. For a Staple to work, it needs to be related to a group.
Note: Staples are visible only in edit mode; they do not appear in the final rendering of the animation, as they are precisely auxiliaries for creation and editing.
Frequent use in facial animation: grouping eyes, mouth, beard, and face into specific Staples greatly simplifies the creation of expressions, blinks, and lip movements. In fact, you will end up using Staples to organize the selection of any objects on the screen.
To organize the depth (Z-order) of objects in the scene, Arttista offers stacking shortcuts. With the current point selection on the screen, you can:
Arttista allows intelligent color extraction from image files:
Arttista allows you to automatically create a color palette from an image file.
This feature can be used to extract colors from photographs, illustrations, visual references, or any other image and transform them into a palette that can be used in your drawing.
In addition to automatic import, you can also manually select specific colors from the image.
To automatically generate a palette from an image:
Arttista will analyze the image and load its colors into the palette according to the chosen options.
After you select the image file, Arttista will open the Palette Importer window.
This window allows you to define how the image’s colors will be selected and added to the palette.
The image is also presented in a File Image Preview area, allowing you to visualize the image being used as the color source.
One import option allows you to load the colors found in the image until the palette is completely filled.
In this mode, Arttista adds the image’s colors until the palette’s capacity is reached.
Use this option when you want to obtain a broad representation of the colors present in the image.
Another option allows you to prioritize the most dominant colors of the image.
In this case, Arttista gives preference to colors that have a greater presence in the image when filling the palette.
This option is useful when you want to capture the main chromatic identity of an image rather than simply obtaining a broad selection of its colors.
A photograph may contain thousands of different colors, but perhaps the predominant colors are:
By prioritizing dominant colors, the palette tends to better represent these main colors.
The Palette Importer has an option to ignore colors that are very similar to each other.
Enable this option when you want to avoid the palette being filled with several practically identical colors.
This helps create a more diverse palette.
After choosing the desired options, press:
Apply
Arttista will load the image colors into the palette.
The palette will then contain the colors extracted from the image.
Tip: After import, you can continue editing and organizing the palette normally.
Once the colors are loaded, they can be applied directly to the drawing objects using drag and drop.
Arttista can highlight the object under the cursor, making it easier to identify the color’s destination.
Important: Use Edit Mode so that Arttista can highlight the object under the cursor during the drag.
If you want to change only the foreground color of an object, hold down the Shift key during drag and drop.
Arttista will apply the color only to the object’s foreground.
Colors from the palette can also be dragged to an object’s background.
This allows you to control the colors used in the foreground and background separately.
You can apply the same color to multiple objects at once.
To do this, pre-select the objects before performing the color drop.
When objects are pre-selected, only those objects will be affected by the color application.
Imagine there are five objects in the scene, but you want to apply a certain color only to three of them.
Only the pre-selected objects will be affected.
Tip: This feature is useful when multiple objects need to receive the same color simultaneously.
In addition to automatic import, Arttista offers a second way to get colors from an image: manual color selection.
In this mode, you can individually choose any color present in the image.
This allows you to choose a specific color without having to automatically import the entire image.
After selecting a pixel from the image, you can drag the color directly to an object.
The flow is:
Image
   ↓
Select pixel
   ↓
Drag the color
   ↓
Object
This is useful when you want to exactly reproduce a color found in a reference image.
The color selected in the image can also be added directly to the palette.
The flow is:
Image
   ↓
Select pixel
   ↓
Drag the color
   ↓
Palette
In this way, you can build a palette manually, selecting only the colors you want to take from the image.
Arttista offers two complementary methods.
Use:
Palette → right-click → Load Colors From Image
This method is indicated when you want Arttista to analyze the image and fill the palette automatically.
You can configure:
In this method, you individually choose pixels from the image.
The selected color can be dragged:
This method offers greater control when you want to choose specific colors.
| Method | How it works | Best used for |
|---|---|---|
| Automatic Import | Analyzes the image and fills the palette | Quickly creating a palette based on the image |
| Prioritize Dominant Colors | Gives preference to predominant colors | Capturing the image’s chromatic identity |
| Ignore Similar Colors | Avoids very close colors | Creating a more diverse palette |
| Manual Selection | Individually chooses image pixels | Selecting specific colors |
| Image → Object | Drags a color directly to an object | Quickly applying a reference color |
| Image → Palette | Drags a color to the palette | Manually building a palette |
Imagine you are creating an illustration and have a reference image with a color combination you want to reproduce.
Choose the palette that will be used to store the colors.
Right-click on the palette and choose:
Load Colors From Image
Select the image file to be used as a reference.
In the Palette Importer window, choose from the available options.
You can, for example:
Click:
Apply
The colors will be loaded into the palette.
Now you can drag the colors from the palette directly to the objects in the drawing.
If you don’t want to create a complete palette, you can directly select a color from the image.
For example, imagine you want to exactly reproduce the color of a shirt present in a photograph.
Instead of importing all colors:
Or, if you want to save this color for later use, drag it to the palette.
When using an image as a color reference, choose the method according to your goal.
Image → Load Colors From Image → Palette Importer → Apply
Image → Load Colors From Image → Prioritize dominant colors → Apply
Image → Load Colors From Image → Ignore similar colors → Apply
Image → Select pixel → Drag to object
Image → Select pixel → Drag to palette
Yes. Right-click on the palette and choose Load Colors From Image.
It’s the window displayed after an image is selected for color import. It allows you to configure how the image colors will be loaded into the palette.
Yes. The Palette Importer has an option to prioritize dominant colors.
Yes. Enable the option to ignore very similar colors.
Yes. You can select any pixel from the image and use its color.
Yes. Select the color in the image and drag it directly to the object.
Yes. Select the color in the image and drag it to the palette.
No. You can manually select a pixel and use only that color.
Yes. Pre-select the objects before performing the color drop. Only the pre-selected objects will be affected.
Hold Shift while dragging the color from the palette to the object.
For drag and drop of colors from the palette onto objects, Edit Mode must be active so Arttista can highlight the object under the cursor.
The color import feature allows you to transform an image into a color source for your project.
Arttista offers two main ways to work with these colors:
Automatic Import
Palette → right-click → Load Colors From Image → Palette Importer → Apply
Manual Selection
Select pixel from image → drag to object or palette
Automatic import is ideal for quickly creating a complete palette or one based on the image’s dominant colors.
Manual selection is ideal when you need precise control over each color.
After creating the palette, colors can be applied to objects via drag and drop, including to multiple pre-selected objects. To change only the foreground, hold Shift during the drag.
SHIFT during the drag, the color is
applied to the object’s stroke (contour) property instead of the
fill.The Color Harmonizer is a tool created to help find more balanced and pleasing color combinations in an illustration.
In this first mode of use, the harmonizer analyzes only the colors already present in the drawing. The current Arttista color palette is not considered.
This allows you to harmonize an illustration directly from its own colors without altering or depending on the currently selected palette.
When using the Color Harmonizer this way, there are two main ways to work:
| Option | Description |
|---|---|
| Harmonize colors using color rule | Modifies the drawing’s colors according to a classic color harmony rule. |
| Adjust colors to mix harmoniously the current colors of the drawing | Analyzes the existing colors in the illustration and adjusts their relationships so they integrate better with each other. |
💡 Tip
The first option is indicated when you want to apply a specific chromatic relationship, such as complementary or analogous colors.
The second is more suitable when you like the current colors of the drawing but want them to interact better with each other, maintaining their original identity.
When this option is selected, Arttista uses color harmony rules to determine how the illustration’s colors should relate.
There are three available rules:
| Rule | Core idea | Result |
|---|---|---|
| Triadic | Uses three colors evenly distributed on the color wheel. | Balanced and vibrant |
| Complementary | Uses colors positioned on opposite sides of the color wheel. | Strong contrast |
| Analogous | Uses colors close to each other on the color wheel. | Soft and harmonious |
Each rule produces a different visual sensation.
The Triadic harmony uses three colors that are approximately equidistant from each other on the color wheel.
In simple terms, imagine dividing the color wheel into three equal parts. The three positions obtained form a triadic combination.
Produces a balanced combination.
Maintains a good variety of colors.
Can generate quite vibrant results.
Useful when you want diversity without losing the relationship between colors.
| Characteristic | Triadic |
|---|---|
| Number of color groups | 3 |
| Relationship | Equidistant |
| Contrast | Medium/High |
| Sensation | Vibrant and balanced |
| Best used for | Colorful and dynamic illustrations |
🧐 Curiosity
Triadic harmony does not simply mean choosing three random colors. What matters is the relationship between their positions on the color wheel.
The Complementary harmony uses colors that are in opposite positions on the color wheel.
For example, a color located in a certain region of the wheel will have as its complement the color found approximately 180° from it.
This relationship creates a very evident contrast.
Produces high contrast between colors.
Makes certain colors appear more intense.
Useful for highlighting important elements.
Can produce more dramatic and vibrant results.
| Characteristic | Complementary |
|---|---|
| Relationship | Opposite |
| Distance on wheel | Approximately 180° |
| Contrast | High |
| Sensation | Vibrant and energetic |
| Best used for | Highlights, contrast, visual impact |
⚠️ Caution
As the contrast is strong, using complementary colors very intensely can make the image visually overloaded. In many cases, it is interesting to let one color dominate the composition and use its complement as an accent.
The Analogous harmony uses colors that are close to each other on the color wheel.
Instead of creating strong contrast, this rule seeks to maintain a smoother transition between colors.
For example, a composition based on green could also use nearby shades of yellow and blue to create a natural chromatic relationship.
Produces smooth transitions between colors.
Creates a more uniform appearance.
Generally conveys a greater sense of balance.
Excellent for environments and illustrations with a specific atmosphere.
| Characteristic | Analogous |
|---|---|
| Relationship | Close |
| Distance on wheel | Small |
| Contrast | Low/Medium |
| Sensation | Soft and harmonious |
| Best used for | Environments, landscapes, atmospheres |
💡 Tip
Analogous harmony is especially interesting when you want to preserve a color atmosphere. A predominantly blue illustration, for example, can be adjusted to incorporate nearby tones without losing its chromatic identity.
The three rules can be understood visually as different ways of distributing colors on the color wheel:
| Rule | Color Position | Contrast | Visual Style |
|---|---|---|---|
| 🔺 Triadic | Evenly distributed | ★★★☆ | Vibrant and balanced |
| 🔴 Complementary | Opposite | ★★★★ | Strong and contrasting |
| 🟢 Analogous | Close | ★★☆☆ | Soft and uniform |
A simple way to choose:
Want variety and balance? → Triadic
Want contrast and impact? → Complementary
Want softness and unity? → Analogous
The second option has a different approach.
Instead of applying a specific color rule, Arttista considers the colors that already exist in the drawing and seeks to adjust their relationships so they mix more harmoniously.
This is particularly useful when the illustration already has a color combination you want to preserve.
This option can be interesting when:
you already like the colors used in the illustration;
you want to maintain the original visual identity;
some colors seem not to match very well;
you want a more natural transition between different regions of the image;
you don’t want to impose a specific chromatic rule like Triadic, Complementary, or Analogous.
🧐 Curiosity
Unlike the Triadic, Complementary, and Analogous rules, this option does not seek to transform the illustration into a combination based on a specific chromatic relationship.
The goal is to improve the relationship between the colors that are already present.
| If you want… | Use |
|---|---|
| A vibrant and balanced combination | Triadic |
| Increased contrast between colors | Complementary |
| A smooth combination | Analogous |
| Preserve current colors but integrate them better | Adjust colors to mix harmoniously the current colors of the drawing |
The Color Harmonizer can be used in two different ways:
Apply a new relationship between colors
Use Harmonize colors using color rule when you want to guide the illustration by a specific color rule.
or:
Improve the relationship between existing colors
Use Adjust colors to mix harmoniously the current colors of the drawing when you want to preserve the original appearance and only make the colors more integrated.
This distinction is important: the first approach defines a harmony rule; the second seeks to harmonize the set of colors the drawing already has.
In this second mode of use, the Color Harmonizer considers both the colors present in the drawing and the colors of the currently selected palette in Arttista.
This allows you to use the palette as a reference to modify, approximate, or harmonize the illustration’s colors.
Unlike the first mode, where only the drawing’s colors are considered, here the current palette becomes part of the harmonization process.
Imagine your drawing has a series of colors and the current palette contains a different set of colors.
The Harmonizer can use these palette colors in different ways:
Therefore, there are five different options.
This is the most direct option.
For each color found in the drawing, Arttista searches the current palette for the closest color and replaces the original color with it.
The result is an image adapted to the colors available in the palette, maintaining, as much as possible, the original appearance.
It’s especially useful when you want to:
Imagine the drawing has:
| Original color | Closest color in palette |
|---|---|
| Dark red | Red |
| Orange | Yellow-orange |
| Light blue | Blue |
| Light green | Green |
Each color is simply associated with its best available match.
💡 Tip
This option is the most indicated when you want the result to use only the colors that already exist in the palette, without creating new intermediate colors.
This option uses the current palette as a reference to adjust the drawing’s colors and create a more consistent and harmonious appearance.
Unlike the previous option, the goal is not simply to find the closest color.
Here, the palette is used as a chromatic reference, guiding the adjustment of colors so they relate better to each other.
Use this option when:
🧐 Curiosity
While the first option can be understood as “which color in the palette is most similar to this?”, this option can be understood as “how can I adjust this color so it better belongs to the palette set?”.
This option also uses the current palette as a reference but emphasizes similarity between colors.
The drawing’s colors are adjusted to approximate the chromatic characteristics found in the palette, allowing a more natural transition between the original colors and the reference colors.
The goal is to create an image where the colors seem to belong to the same chromatic universe.
It’s a good choice when you want to:
💡 Tip
If the Match each color… option seems too aggressive by directly replacing colors, try this option for a more gradual adaptation.
This option works similarly to the previous one but has an important characteristic:
the original luminance of the colors is preserved.
This means that while the color hue is adjusted to approximate the current palette, Arttista seeks to maintain the original light and dark relationship of the image.
Luminance plays an important role in the perception of depth and volume in an illustration.
Imagine an image that has:
If these relationships are excessively altered, the image may lose part of its visual structure.
By preserving luminance, you can change the chromatic identity of the image without significantly altering its distribution of light and shadow.
This option is especially useful when:
💡 Tip
If you like the lighting and contrast of the drawing but want its colors to better match a certain palette, this option can be an excellent choice.
This option uses similarity with the current palette and additionally uses RGB interpolation to perform the transition between colors.
Instead of simply choosing a final color, the process can produce a more gradual approximation between the original color and the reference color.
RGB represents a color through three components:
| Component | Represents |
|---|---|
| R | Red |
| G | Green |
| B | Blue |
RGB interpolation calculates intermediate values between these components.
Simply put, imagine an original color and a palette color:
Original color → Palette color
Interpolation can create a transition:
Original color → Intermediate color → Palette color
This allows for smoother chromatic changes.
This option can be interesting when you want:
🧐 Curiosity
Interpolation does not necessarily mean the result will have only the colors existing in the palette. Unlike the closest color matching option, interpolation can work with intermediate values between colors.
The five options may seem similar, but each has a different purpose:
| Option | Main goal | Preserves luminance? | Uses interpolation? |
|---|---|---|---|
| Closest color | Replace with the most similar available color | ❌ | ❌ |
| Harmonize using palette | Adapt colors to the palette set | — | — |
| Harmonize by similarity | Approximate colors to the palette maintaining more continuity | ❌ | ❌ |
| Similarity + preserve luminance | Approximate colors maintaining light/dark relationship | ✅ | ❌ |
| Similarity + RGB interpolation | Approximate colors through smooth RGB transitions | ❌ | ✅ |
⚠️ Observation
The harmonization options should not be seen as a quality scale. Each produces a different type of transformation and may be more suitable depending on the drawing.
A simple way to decide is to think about the result you want:
→ Match each color to the nearest available color in the palette
This is the most direct option.
→ Harmonize colors using the current palette
Use the palette as a general reference for the illustration’s appearance.
→ Harmonize colors based on similarity to the current palette
Good choice for a more natural adaptation.
→ Harmonize colors based on similarity to the current palette while preserving luminance
Ideal when the relationship between light, shadow, and volume is already working well.
→ Harmonize colors based on similarity to the current palette using RGB interpolation
Use when you want an adaptation based on transitions between RGB values.
Some harmonization operations can be applied more than once.
After performing a harmonization, you can repeat the exact last operation using the command:
Color Harmonization → Repeat Last Color Harmonization
You can also use the shortcut:
Shift + F12
Each time you press Shift + F12, Arttista will execute the last color harmonization again.
Repetition can be used to gradually intensify the effect.
For example:
With each execution, the harmonization is applied again.
The result can progressively change as the operation is repeated.
Caution: Successive repetition can produce results significantly different from the first application. Use it gradually and observe the result.
We can think of the five options this way:
                    CURRENT PALETTE
                         │
          ┌──────────────┴──────────────┐
          │                             │
   CLOSEST COLOR               HARMONIZATION
          │                             │
   Direct substitution         Color adjustment
                                        │
                         ┌──────────────┼──────────────┐
                         │              │              │
                    Similarity    + Luminance    + RGB
                         │              │              │
                     Chromatic     Preserves     Smooth
                     approximation light/dark    transition
The choice depends mainly on how much you want to change the original colors and which characteristics of the image you want to preserve.
💡 Tip
If in doubt, try Harmonize colors based on similarity to the current palette first. Then compare the result with the variants that preserve luminance or use RGB interpolation.
To achieve realistic and imperfect surfaces, the software applies a “noise” system to the textures of Brushes, Pens, and Erasers, configurable in each tool’s properties. This noise and spacing system can be changed before starting to draw a new object so it proceeds with that configuration, or it can be edited later by selecting the objects in the scene and editing the same properties. They are:
It is an Arttista tool for automatically harmonizing the colors of a drawing.
Not necessarily. One of its modes considers only the colors that already exist in the drawing.
Another mode uses both the drawing’s colors and the currently selected palette.
Yes. Use Load Colors From Image to load colors from an image into a palette.
Yes. You can select a pixel from the image and drag its color directly to an object or to a palette.
Yes. Use Load Colors From Image and configure the process in the Palette Importer window.
Yes. The Palette Importer has an option that prioritizes the dominant colors of the image.
Yes. Enable the option that ignores very similar colors.
Yes. Drag the color from the palette to the object.
For the object to be highlighted under the cursor during this process, use Edit Mode.
Hold Shift while dragging the color from the palette to the object.
Yes. Pre-select the objects before the color drop. When objects are pre-selected, only they will be affected.
Yes. A color can also be dragged to the background.
Yes. Use:
Color Harmonization → Repeat Last Color Harmonization
or press Shift + F12.
Yes. Press Shift + F12 repeatedly to execute the last harmonization again.
Yes. There is a harmonization option that adapts colors to the palette while preserving the drawing’s color luminance.
Yes. Options include methods based on color matching, luminance curve, luminance preservation, and RGB interpolation.
Arttista’s Bones system allows you to create skeletons to control and animate points in an illustration.
A bone can control points from one or multiple objects (even from different objects), allowing entire parts of an illustration to be moved, rotated, or scaled together, regardless of association.
Furthermore, different skeletons can be connected to each other, forming bone hierarchies. This allows building complex structures, such as complete characters, vehicles, machines, or even controlling an entire scene through a single bone.
A skeleton in Arttista is a drawing (path) you make with the Bones tool. Creating a skeleton in Arttista is very similar to how the Point Click Pen works.
With the Bone tool active, each click in the Arttista drawing area creates a new Bone Joint, and the joints form the bones that make up the skeleton.
For example:
Joint ●────● Joint────● Joint────● Joint
       Bone     Bone       Bone
Each new click creates a new joint connected to the previous one, thus forming the skeleton. Joints are the skeleton’s points.
When you finish creating the skeleton, there are two ways to end the drawing, similar to when needing to end a path with the Point Click Pen:
Press ESC
Click with the right mouse button
This ends the skeleton creation.
💡 Tip
Think of joints as the articulations of the skeleton or as the points of the skeleton’s path. They determine where each part of the bone connects and, mainly, where objects will be associated.
An important detail of Arttista’s Bone system is that objects are not associated directly with the bone.
The association is made with the Bone Joint.
This allows you to determine exactly which articulation will be responsible for the movement of certain points.
The procedure is simple:
Select the points you want to associate.
These points can belong to one or several different objects.
The selection can contain entire objects or only part of their points.
Select the Joint to which you want to associate the points.
Press Ctrl + B.
Arttista will associate all selected points with that joint.
From that moment on, when the bone is moved, the associated points will follow its movement.
Imagine an arm formed by several objects:
       ● Joint
       │
       │
    ┌──┴──┐
    │ Arm │
    └─────┘
If the arm’s points are associated with the joint, when rotating the bone:
Before                 After

    │                    ╲
    ●                     ●
    │                      ╲
    │                       ╲
the associated content will follow the transformation.
💡Tip: remember that a point or object can only be associated with a single Bone. If you associated an object with bone
Aand then associated it with another boneB, the object will only be associated with boneB.
Internally, Arttista uses a Groups structure to control the association between bones and points.
For each bone, there is a corresponding group.
If you open the Groups tab, you will find groups related to existing bones. Inside these groups are the same objects whose points were associated with the respective bone.
This means there are two ways to create an association.
Select the points, select the joint, and press:
Ctrl + B
You can also:
Select the desired points.
Open the Groups tab.
Select the group corresponding to the bone.
Use the + button to add the current
selection to the group.
The result will be the same: the points will become controlled by the corresponding bone.
🧐 Curiosity
The Groups system allows you to better understand how Arttista internally manages the relationship between bones and objects.
In practice, a bone group functions as the representation of what is associated with that bone.
Just as it is possible to create an association with
Ctrl + B, it is also possible to remove it.
Select the points you want to disassociate.
Select the corresponding Joint.
Press Shift + B.
The association between the selected points and that bone will be removed.
You can also do the same operation through the Groups tab.
Select the points.
Select the group corresponding to the bone.
Click the - button.
The selected points will be removed from the association with that bone.
💡 In summary
Operation Shortcut Groups Associate Ctrl + B+Disassociate Shift + B-
It is important to understand that the group associated with a bone is not just a convenience of the interface.
It is part of the structure used by Arttista to control the association.
Therefore, removing the bone from its own group will cause the structure to stop functioning correctly, as that group will no longer have the bone that represents it.
⚠️ Caution
Be careful when manually editing groups related to bones. Groups are not only for organizing objects: they also participate in the structure that maintains bone associations.
Up to now, we have considered a single skeleton formed by several bones.
But more complex structures may require several independent skeletons.
Imagine a character:
              ● Head
              │
              ● Neck
              │
              ● Torso
              │
              ● Pelvis
             /      \
            /        \
      ● Femur       ● Femur
         │              │
         │              │
       ● Foot          ● Foot
We can create:
a main skeleton, starting at the pelvis and reaching the head;
a skeleton for the right leg;
a skeleton for the left leg.
Now we need to tell Arttista that the legs are part of the main skeleton’s hierarchy.
To connect the skeletons:
Select the Pelvis Joint of the main skeleton.
Also select the first two joints of the leg skeletons.
Press Ctrl + B.
Since there are now three joints belonging to different skeletons, Arttista will display a window asking which one should be the Controlling Joint.
In this example, choose the Pelvis Joint.
From that moment on, the structure acquires a hierarchy:
              Pelvis
              ●
             /│\
            / │ \
           /  │  \
          ●   │   ●
       Leg     │  Leg
      right    │ left
              │
        Main
       skeleton
When the pelvis is moved, the main skeleton will continue to follow the movement, and the two leg skeletons will also be moved according to the hierarchy.
🧠 Important
The association between joints works differently from the association between points and bones.
In the first case, we are saying:
“These points belong to this bone.”
In the second:
“This skeleton belongs to the hierarchy of this other skeleton.”
As Arttista keeps practically the entire mesh of objects visible during editing, it can be difficult to select a joint in a complex scene.
To facilitate this task, there is the mode:
Press and hold the key:
Q
While Q is pressed, Arttista displays on the screen
only the bones, making their selection and editing
easier.
As soon as the Q key is released, the mode is
immediately deactivated, and the normal view returns.
💡 Tip
Use
Qwhenever there are many object points overlapping the joints. It’s a quick way to temporarily “clean” the scene and work only with the skeleton.
Arttista supports Inverse Kinematics (IK).
Inverse kinematics allows you to manipulate one part of a bone chain and have the rest of the structure be adjusted hierarchically.
For example, in a leg:
Hip
   ●
   │
   ● Knee
   │
   ● Foot
Instead of having to adjust each bone individually, you can manipulate the end of the structure and let the system calculate the necessary remaining movements.
IK can be temporarily activated during editing.
Simply hold down the key:
Alt
while moving a bone in the scene.
Arttista will use inverse kinematics to hierarchically adjust the rest of the skeleton and also the skin associated with the bones.
Arttista also allows you to control bone behavior through the section:
To access this section:
Press Tab to enter edit
mode.
Observe the properties panel on the side.
Locate the Bones Working Mode section.
This section has three options that modify the way bones are edited.
Among the Bones Working Mode options, this is one of the most powerful features of the Bones system.
When Bones Live Transformation is activated, changes made to bones during an animation are used by Arttista to automatically adjust the existing animation.
In other words:
You can modify the structure of an animation without simply destroying the animation that already exists.
Imagine a character waving.
The animation has two keyframes:
Frame 1                                  Frame 31
   ●-----------------------------------------●
   Start                                    End
Between these two keyframes, there is a complete animation.
The character’s arm is associated with a bone, and the shirt sleeve also has its own animation.
Thus, we don’t just have:
Bone → movement
We have:
Bone + Skin → complete animation
Imagine now you realize that in the second keyframe, you would like the arm to end slightly lower.
Without Bones Live Transformation, such a structural change could require a new interpolation of the animation, potentially compromising the existing skin animation.
With Bones Live Transformation, simply go to the second keyframe and change the bone.
For example:
BEFORE

Frame 1                         Frame 31
   │                               ╲
   │                                ╲


AFTER

Frame 1                         Frame 31
   │                               ───╲
   │                                    ╲
Arttista will adjust the existing animation to follow the new transformation.
The skin animation continues to be considered.
The concept goes far beyond simply rotating a bone.
With Bones Live Transformation activated, you can change, for example:
position;
rotation;
scale;
combined transformations.
Arttista uses the existing animation as a base and compensates for transformations throughout the animation.
This means you can modify the final appearance of an animation without having to manually rebuild it from scratch.
Imagine again two keyframes:
Keyframe 1
     │
     │
     │     Existing animation
     │
     ▼
──────────────────────────────────
                              │
                              ▼
                         Keyframe 2
Now imagine you go to an intermediate frame and increase the size of the bone.
With Bones Live Transformation, Arttista adapts the animation to incorporate this transformation.
The result will be approximately:
Normal
───────────────╮
                ╰──────────────

Change in the middle
──────────╮
          ╰───────╮
                  ╰────────────
That is, the transformation can be incorporated in the middle of the animation, without simply deleting the movement that already existed.
🧐 Curiosity
This makes Bones Live Transformation something much bigger than a tool specifically for character animation. It can be used to edit and transform complex animated scenes.
Imagine you have a complex scene that is already fully animated.
You want to create a zoom at a specific moment in the animation.
Normally, this could require changing many objects or creating a new animation structure.
With Bones Live Transformation, there is a much simpler approach.
Create a bone that represents the scene’s transformation.
Associate the points of the entire scene with the bone.
This can include even objects that already have other bones and animations.
On the timeline, create:
the initial zoom keyframe;
the final zoom keyframe.
Select the bone and increase its scale.
The entire scene will follow the transformation.
Arttista will preserve the existing animation of the scene while progressively adapting its scale to the new state.
The result will be:
Initial frame
┌───────────────────┐
│                   │
│      SCENE        │
│                   │
└───────────────────┘

          ↓

        Zoom

          ↓

Final frame
┌───────────────────────────────┐
│                               │
│           SCENE               │
│                               │
└───────────────────────────────┘
The animation that already existed within the scene continues to happen while the zoom is applied.
🚀 Advanced
This technique does not need to be used only for zoom.
A bone can function as a kind of transformation control for an entire scene, allowing you to create camera movements, magnifications, reductions, and other transformations on an already animated composition.
The second option in Bones Working Mode makes it easier to identify the points controlled by each bone.
When enabled, hovering the mouse over a Joint shows which points belong to that bone.
This is especially useful in complex scenes where multiple bones and objects may overlap.
The third option in Bones Working Mode controls the permanent activation of Inverse Kinematics.
This is different from using Alt temporarily.
Alt + moving the bone
IK is used only while the key is pressed.
Activate Inverse Kinematics within Bones Working Mode.
From this point on, the editing behavior will use IK continuously,
without needing to hold Alt.
| Option | Function |
|---|---|
| Bones Live Transformation | Allows modifying bones during an animation and adjusting the existing animation in real-time. |
| Show bone points | Shows points associated with the bone when hovering the mouse over its Joint. |
| Inverse Kinematics | Activates inverse kinematics behavior during editing. |
| Shortcut | Function |
|---|---|
ESC |
Ends skeleton creation |
| Right click | Ends skeleton creation |
Ctrl + B |
Associates selected points with a Joint |
Shift + B |
Removes the association between points and a Joint |
Q |
Temporarily activates Spotlight on the Bones |
Alt |
Temporarily activates Inverse Kinematics |
Tab |
Enters Edit Mode and allows access to Bones Working Mode |
Arttista’s Bones system can be understood as three layers:
                  SKELETON
                      │
                      ▼
              ┌───────────────┐
              │     JOINT     │
              └───────┬───────┘
                      │
              associates points
                      │
                      ▼
              ┌───────────────┐
              │    OBJECTS    │
              │     / SKIN    │
              └───────────────┘
And skeletons can also form hierarchies:
             MAIN SKELETON
                     │
                  Pelvis
                 /      \
                ▼        ▼
        Right Leg      Left Leg
        Skeleton       Skeleton
This combination allows Arttista to control from a small part of an illustration to extremely complex structures and entire animated scenes.
🚀 In summary
The Bones system is not just for animating characters.
Bones can be used to control illustrations, characters, objects, groups of objects, hierarchical skeletons, and even transformations of entire scenes.
And, with Bones Live Transformation, these transformations can be applied over existing animations, allowing you to modify complex scenes in a visual, interactive, and non-destructive way.
Arttista uses frame-by-frame animation, even though it is a vector-based editor.
This means each frame can contain a different version of the objects and their points. You can freely modify vectors in any frame of the animation — even if that frame is not a keyframe.
This combination of frame-by-frame animation and editable vector objects provides a very high level of control over the animation.
Before working with interpolation, it’s important to understand the difference between a Frame and a Keyframe.
A frame is simply a position on the timeline where a state of the animation exists.
Everything you modify in the current frame is automatically stored in that frame.
What you do in the current frame stays in the current frame.
This is fundamental to Arttista’s frame-by-frame animation.
A Keyframe is, in practice, a normal frame that has received a special mark.
This mark tells Arttista:
“This frame represents a pose that should be considered during interpolation.”
Therefore, a keyframe is not a special type of frame that stores a different animation.
It is essentially a timeline marker.
For example:
Frame:       1    2    3    4   ...   18   19   20
             🔑                        ·         🔑
           Pose A                              Pose B
If frames 1 and 20 are keyframes and you execute an interpolation, Arttista will use the poses of these two frames as a reference to calculate the intermediate frames.
To create a keyframe, you can:
press Ctrl + F2;
or double-click on the desired position on the timeline.
The same command also removes an existing keyframe.
It is important to understand that removing the keyframe does not remove the animation of that frame.
It simply ceases to be considered a frame marked as a pose for interpolation.
💡 In summary
Frame = position in the animation
Keyframe = frame marked as a reference pose for interpolation
Interpolation allows Arttista to automatically calculate the evolution between two or more poses.
Imagine:
Keyframe 1                              Keyframe 20
    🔑                                        🔑
   Pose A                                    Pose B
      │                                        │
      └────────── interpolation ────────────────┘
Arttista calculates the intermediate states and records the results in the frames between the keyframes.
Interpolation can use different types of curves, such as:
Linear
Ease In
Ease Out
Ease In & Ease Out
There is an extremely important rule:
Arttista only interpolates what is selected in the scene.
If you execute interpolation with no objects or points selected, nothing will be interpolated.
This is deliberately designed to prevent a new interpolation from altering animations that have already been worked on.
This characteristic is especially important in Arttista because it is a frame-by-frame animation software. A new interpolation could replace details that were drawn or adjusted manually.
Therefore, the selection acts as a kind of security filter:
Selected objects
        │
        ▼
   INTERPOLATE
        │
        ▼
Only these objectsBy default, interpolation considers the entire timeline.
For example, imagine an animation with:
200 frames;
6 keyframes.
If you simply execute interpolation, Arttista will consider the entire timeline.
But maybe you want to interpolate only a part, for example:
Frame 20                              Frame 100
   🔑──────────────────────────────────🔑
        ↑                          ↑
      start                       end
In this case, you can create a Selection Range.
Hold down the Ctrl key.
Click on the first desired frame.
Continue holding Ctrl.
Drag to the last desired frame.
Release the mouse.
The selected region will be highlighted on the timeline.
From this point on, animation-related operations, such as interpolation, will be applied only to the selected range.
💡 Tip
The Range works as a second selection layer:
Selection in the scene → which objects will be affected
Range on the timeline → which frames will be affected
This combination provides quite precise control over the animation.
There are two ways to remove the range selection:
press Esc while the mouse is over
the timeline;
or right-click on the timeline and choose
Clear Selection.
When an animation has many keyframes, you don’t need to scroll through the timeline manually.
Use:
Ctrl + → — advances to the next
keyframe;
Ctrl + ← — returns to the previous
keyframe.
To go back to the beginning of the timeline:
Windows/Linux: Backspace
macOS: Home
Interpolation has a special behavior when working with Bones.
When points or objects are associated with a bone, they become part of the Skin of that bone.
In this case, interpolation considers first the movement of the bone and then the animation of the skin itself.
Imagine a hand:
Bone
  │
  ▼
🖐 Hand (Skin)
If the hand is associated with a bone that changes position between two keyframes, the hand’s animation will be calculated considering first the bone’s movement.
This allows the skin to:
follow the bone;
be animated independently relative to the bone;
have its own points modified;
continue following the skeleton hierarchy.
In other words, the bone acts as a reference for the skin’s transformation.
One of the most powerful features of this system is that you do not need to select the entire skeleton to interpolate a specific part of the animation.
Imagine:
Bone A
 └── Skin A

Bone B
 └── Skin B

Bone C
 └── Skin C
You can select only Skin A and interpolate it.
Arttista understands that you want to modify the skin’s animation without creating a new animation for the bone.
On the other hand, if you select Bone A, Arttista understands that you want to interpolate that bone.
In this case, the hierarchy will be considered, including:
the selected bone;
its child bones;
the skins belonging to those bones.
This logic allows for very specific operations.
You can, for example:
select a single point of a skin;
select three points of another skin;
select an entire skin of another bone;
execute a single interpolation.
Arttista will treat each selection according to its respective structure.
This allows for extremely localized corrections without needing to rebuild an entire animation.
🚀 Advanced
This possibility is particularly useful when an animation is almost perfect and only a few points need correction.
Instead of re-interpolating the entire animation, you can select only what needs to be corrected.
Keyframes do not constantly recalculate the animation.
In Arttista, interpolation needs to be explicitly executed.
This is important because Arttista works with a frame-by-frame animation philosophy:
Interpolation is an operation you apply when you want to change the animation.
After it is performed, the results are recorded in the corresponding frames.
Each keyframe has a configuration that determines how the animation should evolve towards the next keyframe.
There are four possibilities.
The transformation starts and ends in a linear fashion.
Movement
│
│        /
│      /
│    /
│  /
│/
└────────────── Time
Indicated when you want a constant speed.
The animation starts smoothly and ends linearly.
Movement
│
│          /
│        /
│      /
│   __/
│__/
└────────────── Time
Useful when you want the movement to gain speed gradually.
The animation starts linearly and decelerates at the end.
Movement
│
│      ______
│    /
│  /
│ /
│/
└────────────── Time
Useful when the movement should end smoothly.
The animation starts smoothly and also ends smoothly.
Movement
│
│          ____
│        /
│      /
│    /
│__/
└────────────── Time
A good option for natural movements, where you want to avoid abrupt acceleration or stopping.
On the timeline, there is a small dot associated with each keyframe.
By clicking on it, Arttista opens a window near the keyframe where you can select the desired curve type.
After changing the curve, you need to execute the interpolation again to apply the new configuration.
This allows, for example, using different curves in different parts of the animation.
💡 Tip
You can select certain objects and re-interpolate them using a different curve than previously used.
In this way, different elements of the same scene can have different acceleration and deceleration behaviors.
⚠️ Caution
This flexibility also means it’s possible to change only part of the animation without realizing that other objects have different curves.
When working with re-interpolation, always check which objects are selected.
As Arttista uses frame-by-frame animation, you can also control the visibility of objects individually along the timeline.
An object can:
be visible on a given frame;
disappear on another;
remain invisible during an interval;
reappear later.
Arttista has six specific commands for this.
Shortcut: Ctrl + F6
Hides the selected objects from the current frame back to the beginning of the timeline.
When there is a selected range, the command considers the start of that range.
START                         CURRENT FRAME
   │                                │
   ▼                                ▼
████████████████████████████████████│
HIDDEN OBJECTShortcut: F6
This is the inverse command.
It makes the selected objects visible again from the current frame back to the beginning of the timeline, or to the start of the selected range.
Shortcut: F7
Makes the selected objects visible on the current frame.
An invisible object normally cannot be selected on that frame.
In that case, you can select the object on a frame where it is still visible and then go to the frame where you want it to reappear.
For example:
Frame 1 ─── Frame 10 ─── Frame 15 ─── Frame 30
                │             │
             visible       invisible
You can:
Go to frame 10.
Select the object.
Go to frame 15.
Press F7.
The object will reappear from that point, also respecting any selected range.
Shortcut: Ctrl + F8
Hides the selected objects from the current frame to the end of the timeline.
When there is a selected range, the end of the range is used as the limit.
Shortcut: F8
This command has a particularly important characteristic.
It not only makes objects visible again.
It also resets the animation of the selected objects from the current frame to the end of the timeline — or to the end of the selected range.
Subsequent frames become identical to the current frame.
This is extremely useful when you realize an animation was incorrectly modified from a certain point.
Instead of correcting each frame individually, you can use this command to clear and reset the animation from that point.
⚠️ Caution
As this command clears the subsequent animation of the selected objects, use it carefully.
Shortcut: Ctrl + F7
Hides the selected objects on the current frame.
If there is a selected range, the operation will be applied to the corresponding range.
Arttista visually represents the visibility periods of objects on the timeline using a green area.
For example, imagine an object that:
is visible from frame 0 to 30;
disappears between 31 and 34;
reappears on frame 35.
The timeline will visually present these periods:
Frame
0                         30  35
│─────────────────────────│   │──────────
███████████████████████████   ███████████
        VISIBLE                  VISIBLE
This allows you to quickly identify at which moments an object is present in the animation.
When multiple objects are selected, the indicator represents visibility considering the selection.
Ranges allow you to select intervals on the timeline and perform operations on a specific region of the animation.
We’ve already seen how to create a range:
Ctrl + click and drag on the
timeline
But the range can also be used to copy or move entire animations.
After selecting a range:
Select the desired objects in the scene.
Hold down the Alt key.
Click on the first frame of the range.
Drag to a new position.
Release the mouse and the Alt key.
Arttista will copy the content of the interval to the new position.
This includes:
frames;
keyframes;
object states;
existing animation.
Only the currently selected objects will be copied.
Imagine a butterfly with:
head;
body;
wings.
If only the head is selected when the range is copied, only the head’s animation will be replicated.
Even if the keyframes are part of the interval, the operation respects the selection of objects.
💡 Tip
Before copying a range, always check which objects are selected.
This combination of Range + Object selection offers great flexibility, but can also produce unexpected results if the selection is not checked.
Arttista also allows moving a range instead of copying it.
To do this:
Select the range.
Select the desired objects.
Hold down the Shift + Alt
keys.
Click on the first frame of the range.
Drag to the new position.
Release the keys.
The operation will move the animation to the new position.
When moving a range, there is an option that determines the behavior of objects in the original position.
This setting is in:
Preferences → General
The option is:
Invalidate Objects in Source When Moving to Another Position
Depending on this setting, the original content can:
remain in the source position;
or be invalidated/cut, leaving the objects without that content in the original position.
⚠️ Caution
This setting can significantly change the result of a range move operation. If the behavior is not as expected, check this option in Arttista’s general preferences.
You can also change the timing of an animation by adding or removing space on the timeline.
This is particularly useful when an animation is:
too fast;
too slow;
needing more time in a certain part;
or when you need to reorganize its timing.
Shortcut: Shift + →
Inserts space on the timeline and shifts the subsequent animation.
For the selected objects, Arttista also repeats the current frame in the inserted intervals.
This allows you to increase the duration of a part of the animation without needing to manually rebuild all the following frames.
Shortcut: Shift + ←
Removes the current frame or the selected interval.
Subsequent frames are automatically shifted backward.
This process is called pull of frames.
💡 Tip
Insert Frame is useful for creating time.
Remove Frame is useful for eliminating time.
Arttista has a special tool for making changes that should be applied throughout the entire animation or a selected range.
This tool is called:
When it is active, a transformation performed on a point or object is applied correspondingly to the frames of the timeline.
For example, imagine you move a point 20 pixels to the right.
With the Keyframe Tool active, this 20-pixel displacement will be applied to the entire animation — or only to the selected range.
This allows you to make global changes without having to edit each frame individually.
The Keyframe Tool can be used for various operations, including:
moving;
rotating;
scaling;
changing colors;
modifying object properties;
and other transformations available in Arttista.
🚀 Advanced
The Keyframe Tool is especially useful when you realize a characteristic needs to be modified in an entire already finished animation.
Instead of going through frame by frame, you can perform the transformation once and let Arttista apply it to the selected set of frames.
The Keyframe Tool can be activated in two ways:
pressing 4;
or using the fourth button of the Working Modes section in the editor’s side panel.
When the tool is active, the mouse cursor changes to a symbol resembling a pointer with a small keyframe dot, indicating the special mode is active.
To return to normal mode:
press 1;
or select the first button in Working Modes.
The Working Modes section has different editing modes.
The main modes covered here are:
| Key | Mode | Function |
|---|---|---|
1 |
Normal | Normal editing mode |
2 |
Scissor | Adds new points to paths |
3 |
Eraser | Removes points from objects |
4 |
Keyframe Tool | Applies transformations throughout the animation |
The Scissor mode is used to add new points to existing objects.
Press:
2
Then, click on a path.
Arttista will add a new point exactly at the position where the mouse was clicked, splitting the segment at that location.
This allows you to add points to existing objects without having to recreate them.
Press:
3
to enter Eraser mode.
This mode allows you to delete points from objects.
It is particularly useful for directly editing the geometry of existing objects.
| Action | Shortcut |
|---|---|
| Create/Remove Keyframe | Ctrl + F2 or double-click |
| Interpolate | F2 |
| Next Keyframe | Ctrl + → |
| Previous Keyframe | Ctrl + ← |
| Start of Timeline — Windows/Linux | Backspace |
| Start of Timeline — macOS | Home |
| Select Range | Ctrl + drag |
| Cancel Range | Esc |
| Clear Range | Right-click → Clear Selection |
| Copy Range | Alt + drag |
| Move Range | Shift + Alt + drag |
| Insert Frame | Shift + → |
| Remove Frame | Shift + ← |
| Hide Back Frames | Ctrl + F6 |
| Show Back Frames | F6 |
| Show Current Frame | F7 |
| Hide Front Frames | Ctrl + F8 |
| Show/Reset Front Frames | F8 |
| Hide Current Frame | Ctrl + F7 |
| Normal Mode | 1 |
| Scissor | 2 |
| Eraser | 3 |
| Keyframe Tool | 4 |
Arttista’s Timeline combines three concepts that, together, provide great editing freedom:
Each frame can be edited individually.
Keyframes act as reference poses for interpolation operations.
Selection determines exactly which elements will be affected by an operation.
This creates a very precise way of working:
                 ANIMATION
                    │
        ┌───────────┴───────────┐
        │                       │
      SCENE                   TIMELINE
        │                       │
   Object selection        Frame Range
        │                       │
        └───────────┬───────────┘
                    │
                    ▼
               OPERATION
                    │
          ┌─────────┼─────────┐
          │         │         │
      Interpolate  Copy     Move
          │       Range     Range
          │
          ▼
       Result
This combination allows everything from a simple frame-by-frame edit to quite complex operations on large stretches of an animation.
💡 Final Tip
Before executing any operation on the Timeline, get into the habit of checking two things:
1. What is selected in the scene?
2. Which interval is selected on the timeline?
These two elements largely determine where and on what Arttista will apply the operation.
This simple rule is one of the best ways to take advantage of all the Timeline’s flexibility without accidentally altering a part of the animation that was already finished.
Follow Last Segment is a particularly useful tool for adding new elements to an animation that is already finished.
It allows selected objects and points to follow the animation of another element in the scene, accompanying its horizontal and vertical displacements along the timeline.
The most interesting thing is that the elements that start following the animation do not lose the animation they already had.
Its operation is based on the last two selected points.
These two points form, for Arttista, an imaginary segment:
        ●────────────────●
      Point 1          Point 2
           ← segment →
Everything that was selected before these two points will start following this segment.
Therefore, it’s important to understand the fundamental rule:
🧠 The last two selected points define the segment to be followed. Everything selected before them will be the content that will follow this segment.
Imagine you have an animation of a surfboard gliding over a wave.
The board:
goes up and down;
moves back and forth;
has a complete animation throughout the scene.
       🌊
    ╭────────╮
    │  BOARD │
    ╰────────╯
       ↕  ↔
After finishing the board’s animation, you decide to add a surfer.
The surfer is drawn later and, initially, is stationary in the position where the board was in the first frame.
It may even have its own animation — for example, hair moving in the wind.
The problem is:
Frame 1

      🧍
    ───────
     board


Frame 30

      🧍
          ───────
           board
The board moved, but the surfer remained in place.
Would it be necessary to redo the surfer’s animation?
No.
It is precisely for situations like this that Follow Last Segment exists.
First, go to the frame where the surfer is perfectly positioned on the board.
Then:
Select all objects/points that make up the surfer that should follow the board.
This can include, for example:
body;
head;
arms;
legs;
hair;
clothes;
other details.
Lastly, select any two points on the top surface of the board.
These two points will form the segment that the surfer will follow.
The selection will conceptually look like this:
        🧍
      SURFER
        ↑
        │
        │ follows
        │
    ●────────●
boardPress:
Ctrl + F5
or use the command:
Timeline → Follow Last Segment
On macOS, the shortcut is:
Alt + F5
Arttista will make the surfer follow the segment defined by the last two selected points.
This is one of the most important characteristics of the tool.
Imagine the surfer’s hair already has an animation:
Frame 1       Frame 10       Frame 20

  hair          hair          hair
    ↘             ↗             ↘
When using Follow Last Segment, this animation is not lost.
Arttista adds the necessary movement for the surfer to follow the board while preserving its existing animation.
The result is the combination of both:
Board movement
          +
Surfer's own animation
          ↓
Surfer's final movement
Thus, the surfer continues moving its hair while following the board across the scene.
🚀 This is one of the great advantages of Follow Last Segment:
you can add elements to an already finished animation without needing to recreate the animation of these new elements.
Follow Last Segment does not only consider horizontal and vertical displacement.
The segment formed by the last two points also has:
position;
rotation;
distance between its points.
Therefore, if the segment undergoes a transformation, the content that follows it will also undergo that transformation.
If the segment rotates:
Before:

●────────●
    🧍


After:

      ●
     /
    /
   ●
   🧍
the selected content will also be rotated accordingly.
If the distance between the two points increases:
Before:

●────●


After:

●────────────●
the content following the segment will also be proportionally adjusted.
This allows Follow Last Segment to follow not only the path traversed by an object but also changes in orientation and size.
⚠️ Caution
This behavior can surprise users who are not yet familiar with the tool.
If the two points of the segment move apart, closer, or rotate during the animation, the selection that follows them will also undergo these transformations.
Follow Last Segment is especially powerful when you finish an animation and later realize you’d like to add an element.
For example:
You may have animated a whole head and only later realized:
“I forgot to add the eyes!”
It’s not necessary to animate the eyes again.
You can:
Create the eyes.
Position them correctly in a frame.
Select the eyes.
Select two points on the head.
Execute Follow Last Segment.
The eyes will start following the head’s movement.
The same concept can be used to add:
lights;
shadows;
details;
accessories;
hair;
clothes;
effects;
decorative elements;
character parts;
additional objects.
And there is a fundamental characteristic:
The new element can have its own animation.
This animation does not need to be lost for the element to start following another object.
Imagine you have animated a submarine.
The submarine:
traverses the scene;
goes up and down;
changes position;
tilts during movement.
But you forgot to create the propeller.
      _________
  ___/         \___
 /                 \
|     SUBMARINE     |◉
 \_________________/
After the entire animation is ready, you draw the propeller in the first frame and position it perfectly at the back of the submarine.
Now you can create an animation for the propeller itself.
For example:
Frame 1       Frame 10       Frame 20

   ◉             ⊕             ◉
  /|\            /|\            /|\
The propeller spins but remains stationary while the submarine moves.
The first frame is perfectly aligned with the submarine.
Now:
Select the propeller.
Select two points on the back of the submarine.
Execute Follow Last Segment.
Arttista will use these two points as the segment the propeller should follow.
The propeller will continue spinning with its own animation but will now also follow the submarine’s movement.
The result will be:
             SUBMARINE
                 │
                 ▼

Frame 1       Frame 10       Frame 20

   ◉             ◉             ◉
  /|\           /|\           /|\
╔══════╗      ╔══════╗      ╔══════╗
│ SUB  │      │ SUB  │      │ SUB  │
╚══════╝      ╚══════╝      ╚══════╝
The propeller maintains its rotation while following the submarine’s trajectory.
🚀 This is exactly the kind of situation for which Follow Last Segment is extremely useful:
adding a secondary animation to a main animation that is already finished.
There is an important rule:
Follow Last Segment always acts from the current frame forward.
This means the existing animation before the current frame is not altered.
For example, if you are on frame 30:
Frame 1                  Frame 30                 Frame 60
   │                        │                        │
   │  remains the same      │──── Follow ──────────►│
   │                        │                        │
Frames before the current frame remain exactly as they were.
This allows you to add elements or correct an animation from a specific point on the timeline without altering what happened before.
Follow Parent Objects is a sibling tool to Follow Last Segment.
Both tools have a similar goal:
making elements added later follow an existing animation.
However, the way they determine movement is completely different.
Movement is based on:
two manually selected points.
Movement is based on the relationship between:
child objects → parent object.
In Arttista, objects created with the Point Click Pen can receive internal content created with tools like:
Brush
Eraser
This internal content is considered a child of the main object.
We can imagine the structure like this:
        PARENT OBJECT
       ╱    │    ╲
      ╱     │     ╲
   Child   Child   Child
Child objects have a spatial relationship with the parent object.
It is precisely this relationship that Follow Parent Objects uses.
Imagine you have a complex object:
        ╭──────────────╮
        │   OBJECT     │
        │    PARENT    │
        │              │
        ╰──────────────╯
And inside it, there is a painting made with Brush:
        ╭──────────────╮
        │   ███████    │
        │ ███████████  │
        │   ███████    │
        ╰──────────────╯
             Child
If the parent object is deformed or animated, we want the painting to follow the object’s surface.
This is exactly what Follow Parent Objects provides.
In Follow Last Segment, you manually choose two points:
●────────────────●
       ↑
    segment
The entire selection follows this segment.
In Follow Parent Objects, there is no single reference segment.
Instead, each part of the child object follows the closest point on the parent object.
Conceptually:
        PARENT OBJECT

   ●────────●────────●
   │   ↑    │   ↑    │
   │   │    │   │    │
   ●   ●    ●   ●    ●
   │   │    │   │    │
   └───┴────┴───┴────┘
       CHILD OBJECT
The final effect is similar to a mesh or filling adhered to the surface of the parent object.
This is an interesting way to visualize the function:
Follow Last Segment makes the object follow a reference defined by two points.
Follow Parent Objects makes the content distribute and follow the surface of the parent object.
Therefore, the second is especially useful for elements that need to remain “stuck” to a surface.
For example:
shadows;
paintings;
textures;
details;
marks;
reflections;
elements drawn inside an object.
Imagine a head with a shaded area painted with Brush.
       _________
     /           \
    |   █████     |
    |  ███████    |
     \___________/
The painting follows the head because it is related to the parent object.
If the head moves or is deformed, we can use Follow Parent Objects to make the child content follow the corresponding surface.
To use the function:
Select the child objects you want to follow the parent object.
Also select the parent object.
Execute:
Ctrl + Shift + F5
or use:
Timeline → Follow Parent Objects
From the current frame onward, the child objects will start following the corresponding displacement of the parent object.
An important feature of Arttista’s system is that Brushes and Erasers can have more than one parent object.
This is extremely useful in situations where an element crosses different parts of an illustration.
Imagine, for example, a shading painting that partially belongs to:
the head;
and the neck.
Conceptually:
        HEAD
       ╲█████╱
        █████
        █████
       ╱█████╲
      NECK
The same shading element can have a relationship with both objects.
If you want only a certain part of the shading to follow the head:
Select the head.
Select the desired part of the shading.
Execute Ctrl + Shift + F5.
To make another part follow the neck:
Select the neck.
Select the corresponding part of the shading.
Execute Ctrl + Shift + F5
again.
Thus, different parts of the content can follow different parent objects.
Although they are sibling tools, it’s important to choose the tool according to the type of relationship you want to create.
| Feature | Follow Last Segment | Follow Parent Objects |
|---|---|---|
| Reference | Two points | Parent object(s) |
| Reference selection | 2 last selected points | Parent object |
| Movement | Follows the segment | Follows the corresponding surface/structure of the parent |
| Segment rotation | Follows | Follows corresponding transformation |
| Size change | Follows | Follows corresponding transformation |
| Ideal for | Elements added to an animation | Content adhered to objects |
| Example | Propeller following submarine | Shading following head |
| Shortcut — Windows/Linux | Ctrl + F5 |
Ctrl + Shift + F5 |
| Shortcut — macOS | Alt + F5 |
Ctrl + Shift + F5 |
A simple way to decide:
“I want this object to follow this movement.”
Examples:
a surfer following a board;
a propeller following a submarine;
eyes following a head;
a light following an object;
an accessory following a character.
“I want this content to be adhered to the surface of this object.”
Examples:
shadow on a head;
texture on an object;
painting on a surface;
internal details;
reflections;
elements that need to follow different regions of a shape.
Follow Last Segment and Follow Parent Objects share a characteristic that makes them especially powerful:
You don’t necessarily have to recreate the entire animation when you decide to add an element.
You can finish an animation, realize you missed something, and add that element later.
If the new element already has its own animation, it can also be preserved while it starts following the existing animation.
This opens many possibilities for working incrementally:
MAIN ANIMATION
        │
        ▼
   new element
        │
        ▼
Follow Last Segment
        │
        ▼
element follows
        │
        +
own animation
        │
        ▼
   FINAL RESULT
Instead of planning absolutely every element before starting to animate, you can build and enrich the animation progressively.
💡 Tip
Experiment with these tools not only for characters.
They can be used to add details, effects, lighting, shadows, accessories, secondary objects, and countless other parts of an already existing animation.
Many times, what seems to require a whole new animation can be solved simply by making the new element follow an animation that already exists.
Freeze Textures is a tool created to solve a specific situation that can occur when textured lines are used in animations.
To understand why this tool exists, it’s first important to understand how Arttista normally works with textures on lines.
Objects created with tools like:
Pen
Brushes
Erasers
can use lines with textures.
When such an object has a textured line, Arttista does not simply maintain the same amount of textures regardless of the line’s size.
Each time the object’s points are moved, the line is redrawn.
During this process, Arttista recalculates the amount of textures needed so the line maintains good visual quality.
We can imagine a line formed by several points:
●──────●──────●──────●If the points are moved apart:
●──────────●──────────●──────────●the line’s distance has changed.
Arttista then recalculates the amount of textures needed to adequately fill this new distance.
For static illustration, this behavior is excellent.
Imagine you greatly increase the size of a line.
Arttista can increase the number of textures used so the line continues to have a consistent appearance.
Smaller line

●≈≈≈≈≈≈●


Larger line

●≈≈≈≈≈≈≈≈≈≈≈≈≈≈●
The number of textures is adapted to the new dimension of the line.
This helps preserve the visual quality and density of the texture.
For animation, however, this behavior can produce an undesirable effect.
Imagine a textured line that has animated points:
Frame 1

●≈≈≈≈≈≈≈≈●


Frame 2

●≈≈≈≈≈≈≈≈≈≈≈≈●


Frame 3

●≈≈≈≈≈≈≈≈≈≈≈≈≈≈≈●
As the points move, the distance between them changes.
Arttista recalculates the number of textures needed for each new distance.
Thus, during the animation, the texture itself may appear to be changing density.
In certain situations, this can cause an unwanted appearance or a texture that seems to “breathe”, “pulse”, or change behavior while the line is animated.
⚠️ Important
The problem is not an error in the texturization system.
Arttista is doing exactly what it was designed to do: recalculating textures to preserve the visual quality of the new geometry.
The problem is that this behavior, which is great for illustration, is not always desirable in an animation.
It is precisely for these cases that Freeze Textures exists.
This function allows you to freeze the number of textures used to draw a line.
After the textures are frozen, Arttista stops recalculating this quantity as the corresponding points are moved.
In other words:
NORMAL BEHAVIOR

Point movement
        ↓
Line redrawn
        ↓
Distance recalculated
        ↓
Number of textures recalculated
With Freeze Textures:
Point movement
        ↓
Line redrawn
        ↓
Number of textures remains frozen
This allows the texture to maintain a much more consistent behavior during animation.
Imagine a textured line that moves continuously during an animation.
Without Freeze Textures:
Frame 1     ███████
Frame 2     █████████
Frame 3     ███████████
Frame 4     █████████
Frame 5     ████████
The number of textures may be recalculated as the geometry changes.
With Freeze Textures:
Frame 1     █████████
Frame 2     █████████
Frame 3     █████████
Frame 4     █████████
Frame 5     █████████
The number of textures used remains frozen, even if the distance between points changes.
This can produce a much more stable appearance for the texture throughout the animation.
There is an important characteristic that must be understood:
Freeze Textures is sensitive to the current view zoom/scale.
This means the number of textures that will be frozen depends on the scale at which the procedure was performed.
For example, imagine you are working with a certain zoom level and apply Freeze Textures.
If the line ends up with too few textures for the desired result, you can redo the procedure using a more zoomed-in view.
If you applied Freeze Textures and realized the line ended up with too few textures, you can adjust the result.
The procedure is:
Undo the previously applied Freeze Textures.
Increase the zoom level of the scene.
Apply Freeze Textures again.
The new procedure will be performed considering the new view scale.
💡 Tip
If you want a larger number of frozen textures, try applying the function with a higher zoom.
This allows you to visually control the density of the frozen texture.
Arttista provides a visual indication to show which points have undergone the procedure.
After a point is subjected to Freeze Textures, its icon changes.
A symbol resembling a 🔗 chain appears next to the point.
For example:
Normal point:

    ●


Point with frozen texture:

    ● 🔗
This indicator allows you to quickly identify which points have the frozen texture behavior.
🧐 Curiosity
The chain serves as a visual indication that that point has its number of textures frozen.
There are two ways to use the function.
Click the Freeze Textures button, identified by the chain icon.
Use the shortcut:
Ctrl + P
The function will be applied to the points corresponding to the current selection.
Freeze Textures is especially useful when you notice a texture is changing appearance during an animation because the line’s geometry is being altered.
It can be used, for example, on:
lines drawn with texture;
hair;
textured contours;
brush strokes;
character details;
objects deformed during an animation;
elements that increase or decrease in size;
lines that significantly change length.
Arttista’s default behavior is designed to preserve the visual quality of the texture.
When the geometry changes:
Points change
    ↓
Line length changes
    ↓
Textures are recalculated
    ↓
Visual quality is preserved
This is excellent for illustration.
However, in an animation, you may prefer that the number of textures remains constant:
Points change
    ↓
Line length changes
    ↓
Number of textures remains frozen
    ↓
Texture remains more stable during animation
It is precisely this situation that Freeze Textures resolves.
🚀 In summary
Freeze Textures allows you to transform Arttista’s dynamic texturization behavior into a stable behavior, freezing the number of textures used for a line.
If the result does not have the desired texture density, remember that the procedure is sensitive to the current zoom. Increasing the zoom and applying Freeze Textures again allows you to obtain a larger number of textures.
The Shape Library is much more than a collection of geometric shapes.
Traditionally, a shape library contains elements like:
▭ Rectangles
□ Squares
○ Circles
★ Stars
and other basic shapes.
In Arttista, however, the Shape Library goes far beyond traditional shapes.
It can function as a true repository of reusable elements, allowing you to store and reuse:
shapes;
objects;
complete illustrations;
animated objects;
characters;
objects with skeletons;
animations;
different poses;
facial expressions;
and other elements created in Arttista.
This allows you to build, over time, a personal library of elements that can be reused in different drawings and animations.
Any drawing currently in the scene can be turned into an item in the Shape Library.
To do this, simply use:
Ctrl + Shift + E
or access:
File → Export to Shape Library
After export, the drawing will be available in the Shape Library.
From that moment on, it can be reused in any other drawing.
💡 Tip
Think of the Shape Library as a personal collection of elements you can build over the course of a project.
You can create once and reuse as many times as you want.
Basic import is extremely simple.
Click on the desired drawing or object in the library.
After selecting the item, click on the desired position within Arttista’s current scene.
The content will be immediately imported into the scene.
Shape Library
      │
      │ click
      ▼
  [ Character ]
      │
      │ click on scene
      ▼
┌─────────────────────┐
│                     │
│     🧍              │
│                     │
└─────────────────────┘
This is the normal way to import an element.
But there is a much more powerful way to do this import.
When selecting an item from the Shape Library and clicking on the
scene while holding Shift, Arttista
activates the Merge system.
At this point, a window will be presented allowing you to configure how the imported content should be combined with the content already in the scene.
There are two main concepts:
Allows replacing certain existing objects with newly imported objects.
Allows replacing the visual content of a character or object, preserving the pose of the bones that already exist in the scene.
Both systems work similarly but have different goals.
Imagine you have created a character and developed several facial expressions.
For example:
          CHARACTER

   😀      😢      😡      😮
 happy    sad    angry  surprised
Each expression can be stored as a separate item in the Shape Library.
You could have:
| Item | Expression |
|---|---|
| Character_Happy | 😀 Happy |
| Character_Sad | 😢 Sad |
| Character_Angry | 😡 Angry |
| Character_Surprised | 😮 Surprised |
| Character_Confused | 🤨 Confused |
This transforms the Shape Library into a true facial expression library.
But there is a problem.
If the current character already has a face and you import a new expression normally, the new face will simply be placed next to the old one.
That’s not what we want.
We want something like:
Before:

        😀
      CHARACTER


After Merge:

        😡
      CHARACTER
Or:
The new expression should replace only the corresponding part of the current character.
This is exactly what Object Merge allows you to do.
Object Merge allows you to import new objects and use them to replace only certain existing objects.
To do this, Arttista uses a fundamental resource:
More specifically, the name of the groups.
Imagine that during the creation of the facial expression, you placed:
eyes;
nose;
mouth;
eyebrows;
inside a group named:
Face
Face
 ├── Eyes
 ├── Nose
 ├── Mouth
 └── Eyebrows
When exporting this expression to the Shape Library, this group information is preserved.
Now imagine that in the current scene, the character also has a group named:
Face
When you import the new expression using Merge, Arttista will find this group in the current scene.
It will then know that the imported content corresponds to that group.
The result is a targeted replacement:
Current scene

Character
 ├── Body
 ├── Hair
 └── Face  ← will be replaced
       │
       ▼
   new Face
The rest of the character remains intact.
🎯 This is the core idea of Object Merge:
groups act as identifiers that allow Arttista to discover exactly which parts of the scene should be replaced.
When clicking on the scene while holding
Shift, the Merge configuration window will
be presented.
One of the available options is:
When this option is enabled, Arttista searches the current scene for objects that share the same groups as the objects being imported.
These old objects are hidden, and the new content is placed in their place.
Thus, in the character example:
Group "Face"

Old:
😀

      ↓ Merge

New:
😡
The character remains the same, but its facial expression is replaced.
Pose Merge uses the same principle as Object Merge but adds an especially powerful capability:
preserving the pose of the bones that already exist in the scene.
Imagine you have created a character in three views:
       Front       45°       Profile

         🧍          🧍          🧍
        /│\         /│\         /│\
        / \         / \         / \
Each of these versions can be stored in the Shape Library.
Now imagine that in the current animation, the character is jumping from the front.
             🧍
            /│\
            / \
             ↑
          jumping
In the middle of the jump, you decide he should be sideways, but without altering his body pose.
This is where Pose Merge becomes extremely interesting.
You can import the profile version of the character using Pose Merge.
Arttista will:
identify the corresponding objects;
identify the corresponding skeletons;
reuse the existing bones;
replace the old skins with the new ones;
preserve the current pose of the bones.
Conceptually:
CURRENT CHARACTER

     🧍
    /│\
    / \
    ↓
current pose


       +


CHARACTER FROM SHAPE LIBRARY

     🧍
    /│\
    / \
   profile


       ↓
   POSE MERGE


       ↓


CHARACTER
in profile
with current pose
Thus, the character can change its appearance or perspective without simply starting a new animation from scratch.
In the Merge configuration window, there is also the option:
This option controls the behavior of skins associated with bones during Merge.
When enabled, Arttista:
imports the new content;
identifies the corresponding skeletons;
identifies the associated skins;
hides the old skins;
places the new skins in their place;
maintains the corresponding bone structure.
This is especially important for Pose Merge.
Imagine you have in the Shape Library:
Character Front
Character 45°
Character Side
Now there is an animation where the character is running.
You can start using the front version:
Frame 1
   🧍
   ↓
Running
At a certain point in the animation, you want to change its perspective.
Instead of recreating the entire animation, you can use Pose Merge to replace the character’s appearance with the 45° or profile version, while maintaining the pose of the existing bones.
This can be extremely useful for animations that need to alternate between different views of a character.
Naturally, there is a side effect that must be understood.
A front version and a profile version of a character are different drawings and have different geometries.
By reusing the same bones to control a skin created in another perspective, Arttista needs to adapt one visual structure to the other.
Therefore, the result may not be perfect in all situations.
Bone Structure
      │
      ├── Front skin
      │
      └── Profile skin
Still, this capability can be extremely useful for accelerating animation creation.
💡 The goal of Pose Merge is not to replace the need to correctly draw each perspective.
It allows reusing an animation structure and an existing pose when changing the visual content associated with it.
There is yet another very interesting possibility.
A single item in the Shape Library can have more than one frame.
This means you don’t necessarily need to create three separate exports to store:
front;
45°;
profile.
You can put everything within a single animation:
Shape Library Item

Frame 1  → 🧍 Front
Frame 2  → 🧍 45°
Frame 3  → 🧍 Profile
When performing the import, you can choose which frame of the Shape Library item you want to use.
Thus, a single item can function as a small collection of variations or poses.
When we combine all these features, the Shape Library ceases to be simply a library of shapes.
It can function as a true production repository.
For example:
                    Shape Library
                         │
       ┌─────────────────┼─────────────────┐
       │                 │                 │
   Characters         Expressions         Poses
       │                 │                 │
       ├── Front         ├── Happy         ├── Running
       ├── Profile       ├── Sad           ├── Jumping
       └── 45°           ├── Angry         └── Sitting
                         └── Surprised
And, as items can contain animation and skeletons, this reuse can go far beyond simply copying and pasting drawings.
The great advantage of this system appears when you start building your own library over time.
You can create once:
a character
and then store:
different expressions;
different perspectives;
different poses;
different versions;
animations;
accessories;
reusable elements.
Later, these elements can be combined in new scenes via the Shape Library, using normal import, Object Merge, or Pose Merge.
This transforms the Shape Library into a tool for reuse and animation assembly, not just for inserting ready-made shapes.
| Feature | Function |
|---|---|
| Shape Library | Stores and reuses shapes, objects, and animations |
| Export to Shape Library | Saves the current content as a library item |
| Normal Import | Inserts the item into the scene |
| Object Merge | Replaces specific objects with the imported objects |
| Groups | Allow identifying which objects should be replaced |
| Hide old objects that share same groups | Hides the old objects that belong to the same groups |
| Pose Merge | Merges while preserving the pose of existing bones |
| Hide old bones skins | Controls the replacement of skins associated with bones |
| Import by frame | Allows choosing which frame of an animated item will be used |
💡 In summary:
The Shape Library allows work created in Arttista to be treated as a set of reusable elements.
You can create an element once and reuse it in other scenes. With Object Merge, you can replace specific parts of a composition. With Pose Merge, you can also reuse bone structures and existing poses while changing a character’s appearance.
The result is a workflow where drawings, animations, objects, and poses can be built once and reused countless times.
The Sprite Sheet Exporter allows you to export an animation created in Arttista as a single image containing all frames of the animation, organized in rows and columns.
This feature is especially useful when the animation will be used in a game engine or any application that plays animations from a sequence of frames.
For example, an animation can contain different movements of a character, such as:
running;
jumping;
attacking.
All these movements can be present on the same timeline and can be exported to a single Sprite Sheet.
A Sprite Sheet is an image that contains several frames of an animation organized in a grid.
Each cell in this grid corresponds to a frame of the animation.
The size of each cell is determined by the size of the drawing area at the time of export.
For example, if each frame is 256 × 256 pixels, each cell of the Sprite Sheet will have exactly that size.
The number of columns determines how many frames will be placed horizontally in each row.
The remaining frames continue on the following rows until the entire animation is included.
Before exporting a Sprite Sheet, it’s important to prepare the animation so each frame has exactly the desired size.
This is especially important when the animation was originally created at a higher resolution.
Imagine an animation created in Full HD (1920 × 1080).
You might want to use this same animation in a game engine with frames of 256 × 256 pixels.
In this case, you will first need to change the drawing area size and then manually adjust the animation to fit this new area.
Access:
Drawing → Resize
In the resize window, define the width and height, in pixels.
These values determine the size of each individual frame of the animation.
For example:
Width: 256 px
Height: 256 px
In this case, each exported frame will be 256 × 256 pixels.
Important: these values represent the size of each frame, not the total size of the Sprite Sheet.
When defining the width and height of the frames, uncheck the option that forces Arttista to maintain the drawing’s proportion.
This allows you to define the width and height independently.
This option is important when you need the drawing area to have exactly the dimensions required by your game engine or project.
Also uncheck the option:
Resize all objects
In this procedure, the objects will not be automatically resized by Arttista.
The adjustment of the animation will be done manually.
This allows you to better control the positioning and size of the character within the new drawing area.
After changing the size of the drawing area, adjust the animation objects so the character is properly framed.
With the KF tool enabled:
Select all objects using Shift + Ctrl + A.
Press S to resize the animation.
Manually adjust the size and position of the objects as needed.
The goal is to make the entire animation fit within the new drawing area.
After adjusting the character, go through the entire timeline and check the animation frame by frame.
Make sure no important part of the character is outside the valid drawing area.
This check is especially important in animations that have wide movements, such as:
outstretched arms;
legs during a run;
characters jumping;
attacks;
weapons or other objects that accompany the character.
Caution: elements that are outside the drawing area may not appear in the exported frame.
The drawing area functions as the limits of each frame of the Sprite Sheet.
The size of the drawing area can be changed again at any time.
Access:
Drawing → Scale
Use this option to change the width and height of the drawing area.
When modifying these dimensions, the size of each frame will also change.
Arttista uses the new frame size to calculate the final size of the Sprite Sheet during export.
Tip: you can experiment with different frame sizes and immediately see how this affects the final size of the Sprite Sheet.
When the animation is ready, access:
Animation → Render → Sprite Sheet
Arttista will open the Sprite Sheet export options.
The columns option determines how many frames will be placed horizontally in each row of the Sprite Sheet.
For example, consider an animation with 20 frames.
If you choose 5 columns, the Sprite Sheet will be organized like this:
Frame 01 | Frame 02 | Frame 03 | Frame 04 | Frame 05
Frame 06 | Frame 07 | Frame 08 | Frame 09 | Frame 10
Frame 11 | Frame 12 | Frame 13 | Frame 14 | Frame 15
Frame 16 | Frame 17 | Frame 18 | Frame 19 | Frame 20
In this example:
Frames: 20
Columns: 5
Rows: 4
Therefore, the Sprite Sheet will have a grid of 5 × 4 frames.
Columns = number of frames in each row.
Rows = number of rows needed to accommodate all frames.
The final size of the Sprite Sheet depends on:
size of each frame;
number of columns;
number of rows needed.
The final width can be determined by:
Sprite Sheet Width = frame width × number of columns
The final height can be determined by:
Sprite Sheet Height = frame height × number of rows
Consider:
20 frames;
each frame 256 × 256 pixels;
5 columns.
4 rows will be needed.
Therefore:
Width:
256 × 5 = 1280 pixels
Height:
256 × 4 = 1024 pixels
The Sprite Sheet will be:
1280 × 1024 pixels
             5 columns
┌────────┬────────┬────────┬────────┬────────┐
│ Frame  │ Frame  │ Frame  │ Frame  │ Frame  │
│   01   │   02   │   03   │   04   │   05   │
├────────┼────────┼────────┼────────┼────────┤
│ Frame  │ Frame  │ Frame  │ Frame  │ Frame  │
│   06   │   07   │   08   │   09   │   10   │
├────────┼────────┼────────┼────────┼────────┤
│ Frame  │ Frame  │ Frame  │ Frame  │ Frame  │
│   11   │   12   │   13   │   14   │   15   │
├────────┼────────┼────────┼────────┼────────┤
│ Frame  │ Frame  │ Frame  │ Frame  │ Frame  │
│   16   │   17   │   18   │   19   │   20   │
└────────┴────────┴────────┴────────┴────────┘
             4 rows
Arttista shows the resulting size of the final image during export configuration.
The final size of the Sprite Sheet can be easily changed by modifying the size of each frame.
To do this, access:
Drawing → Scale
Change the width and height of the drawing area.
Arttista will recalculate the final image size based on the new size of each frame and the number of columns set for export.
For example, keeping 20 frames and 5 columns:
| Size of each frame | Final size |
|---|---|
| 128 × 128 | 640 × 512 |
| 256 × 256 | 1280 × 1024 |
| 512 × 512 | 2560 × 2048 |
Thus, you can test different frame sizes without having to manually calculate the final image size.
Imagine you have an animation of a character with:
36 frames;
animation originally created in Full HD;
desired frames of 256 × 256 pixels;
6 columns in the Sprite Sheet.
First, change the drawing area size to:
256 × 256 pixels
Then, manually adjust the animation so the character remains within this area during all frames.
During export, choose:
6 columns
As there are 36 frames:
36 ÷ 6 = 6 rows
The Sprite Sheet will have:
6 columns × 6 rows
And its size will be:
1536 × 1536 pixels
After export, the Sprite Sheet can be imported into a game engine.
The engine can use each cell of the image as an individual frame of the animation.
For example, if the Sprite Sheet has frames of 256 × 256 pixels, the game engine should interpret each 256 × 256 pixel region as a separate frame.
The organization of the frames allows reproducing the original animation created in Arttista.
Before exporting, go through the entire animation and check if the character remains within the frame limits.
If the Sprite Sheet will be used in a game engine, choose the frame size according to the resolution needed in the game.
The number of columns directly alters the final width of the Sprite Sheet.
A larger number of columns produces a wider image with fewer rows.
Before exporting, check the final size shown by Arttista to ensure the resulting image is suitable for your project.
Yes. The original project size does not need to be the same as the Sprite Sheet frame size. You can resize the drawing area and adjust the animation to the new size.
The size of each frame corresponds to the width and height of the drawing area at the time of export.
It is the number of frames that will be placed horizontally in each row of the Sprite Sheet.
Yes. Use Drawing → Scale to change the size of the drawing area.
No. If you want to manually control the size and positioning of the animation, uncheck Resize all objects when resizing the drawing.
Check if that part of the character is outside the valid drawing area in some frame of the animation. Elements that exceed the drawing limits may be cut off in the exported frame.
Yes. More columns increase the width of the Sprite Sheet and, depending on the total number of frames, may decrease the number of rows.
Yes. Arttista shows the resulting image size based on the frame size, number of frames, and chosen number of columns.
To export an animation as a Sprite Sheet:
1. Access Drawing → Resize.
2. Define the desired width and height for each
frame.
3. Disable maintaining proportion, if necessary.
4. Disable Resize all objects.
5. With the KF tool enabled, select all objects with
Shift + Ctrl + A.
6. Press S and manually adjust the
animation.
7. Check all frames to ensure the character is within
the drawing area.
8. Access Animation → Render → Sprite
Sheet.
9. Choose the number of columns.
10. Check the final size calculated by Arttista.
11. Export the Sprite Sheet.
12. Import the image into your game engine and
configure each cell as an animation frame.
Tracks allow you to organize different groups of keyframes within the same timeline.
They are especially useful for separating different parts of an animation, organizing the points that belong to certain elements, and working with multiple characters or groups of objects independently.
A Track functions as a way to group and organize related keyframes and points, facilitating selection and animation editing.
Tracks can be used to:
separate different groups of keyframes;
organize the animation of different characters;
keep new poses or keyframes separate from existing ones;
quickly select all elements related to a Track;
select specific points that belong to a Track;
facilitate operations like interpolation;
organize points that are frequently used during editing.
One of the main advantages is that you can continue adding new keyframes without having to alter or lose the keyframes already organized in other Tracks.
To add a new Track, press the Add Track button in the Tracks interface.
When creating a new Track, Arttista displays a dialog asking for a name for the Track.
Choose a name that clearly identifies the content that will be associated with it.
For example:
AxelTrack
AaronTrack
After confirming, the new Track will be added to the timeline.
One of the most important uses of Tracks is to separate the animation of different characters.
Imagine a scene containing two characters:
Axel, within the Axel
group;
Aaron, within the Aaron
group.
You can create two Tracks:
AxelTrack
AaronTrack
Then, place each character group within its corresponding Track:
AxelTrack
└── Axel

AaronTrack
└── Aaron
In this way, each character’s animation is associated with its own Track.
After organizing the characters in their respective Tracks, you can quickly select the entire animation related to a character.
To do this, simply double-click on the Track.
For example:
Double-click on AxelTrack
The Axel group will be selected, and Arttista will enter
SpotLight Mode, focusing the editing on the elements
related to that Track.
Likewise:
Double-click on AaronTrack
will select the Aaron group and allow you to work with
the corresponding elements.
Tip: double-clicking on a Track is a quick way to select and work with everything related to that group.
One of the great advantages of Tracks appears when you continue working on the animation.
Imagine Axel’s animation is already organized within
AxelTrack.
Later you add new poses or new keyframes to the character.
These new poses will also be associated with AxelTrack.
This means you can continue adding content to the animation without losing the existing organization.
Later, simply double-click AxelTrack to select the
elements related to Axel’s animation again.
The same principle applies to AaronTrack and the other
Tracks created in the project.
Tracks also allow you to control which points belong to a specific Track.
After selecting the desired points, use the corresponding button to add the selected points to the current Track.
This is useful when you want certain points to be considered part of a specific Track.
For example, a Track can contain the points you want to animate or select frequently.
If certain points should no longer belong to the current Track, select them and use the corresponding button to remove the selected points from the Track.
This allows you to adjust the Track’s composition at any time.
Thus, a Track does not need to remain with the same points throughout the entire project.
You can add or remove points as the animation evolves.
Tracks also offer a quick way to select the points related to the current Track.
Use the select points of the current Track button.
Arttista will select the points that belong to the Track.
This is particularly useful when you want to perform an operation only on the points associated with that Track.
For example, you can use this selection before performing an interpolation or another editing operation.
Tip: if you know certain points will be used repeatedly, placing them in a Track allows you to select them quickly when needed.
You can also remove from the selection all points belonging to the current Track.
Use the corresponding button to deselect all points that belong to the current Track.
This facilitates switching between different sets of points during animation editing.
Without Tracks, adding new keyframes to an animation can make organization more difficult, especially when different groups of keyframes need to be handled separately.
With Tracks, you can create a new Track to organize new keyframes.
This allows you to continue adding poses and animations without losing the organization of keyframes already existing in other Tracks.
For example:
Track 1
├── Existing keyframes
└── Associated points

Track 2
├── New keyframes
└── New associated points
Each Track maintains its own set of related elements.
A Track can also be used to facilitate the selection of points that will participate in an interpolation.
Imagine you have many points in the scene but want to interpolate only a specific set.
If these points are associated with the current Track, you can use the command to select points of the Track to select them quickly.
Thus, the Track can function not only as a way to organize keyframes but also as a practical way to organize sets of points that will be manipulated together.
Consider a scene with two characters:
Scene
├── Axel
└── Aaron
Create two Tracks:
Tracks
├── AxelTrack
└── AaronTrack
Associate each character with their respective Track:
AxelTrack
└── Axel

AaronTrack
└── Aaron
Now:
a double-click on AxelTrack selects Axel and activates SpotLight Mode;
a double-click on AaronTrack selects Aaron and activates the corresponding SpotLight Mode;
new Axel keyframes continue to be associated with
AxelTrack;
new Aaron keyframes continue to be associated with
AaronTrack;
the points used in each character’s animation can be organized in their respective Tracks.
In this way, a single scene can contain multiple characters without their animations needing to be treated as a single set.
Tracks offer three main benefits.
You can separate different groups of keyframes and points within the same timeline.
You can quickly select elements related to a Track, including character groups and associated points.
You can continue adding new keyframes and organizing new elements without losing the separation of content already in other Tracks.
Tracks are especially useful when:
a scene has multiple characters;
different characters have independent animations;
you need to separate groups of keyframes;
certain points need to be selected frequently;
you want to facilitate interpolation operations;
you want to organize new keyframes separately from existing ones;
you need to quickly switch between different animation groups.
For a simple animation, perhaps a single Track is sufficient. In more complex scenes, multiple Tracks can make the project much easier to organize and edit.
A Track is a way to organize groups of keyframes and related points within Arttista’s timeline.
Yes. You can create different Tracks to organize different animation groups.
Yes. When creating a new Track, Arttista displays a dialog asking for a name.
Yes. This is one of the most useful applications of Tracks. You can
create, for example, AxelTrack and AaronTrack
to separate the animations of two characters.
Arttista selects the group associated with the Track and enters SpotLight Mode with those elements.
Yes. New poses or keyframes related to the group can continue to be associated with the Track.
Yes. Select the desired points and use the command to add the selected points to the current Track.
Yes. Select the points and use the command to remove them from the current Track.
Yes. Arttista has a command to select the points related to the current Track.
Yes. You can organize the points you want to manipulate in a Track and later select the Track’s points to facilitate operations like interpolation.
Yes. Create one Track for each character or animation group and associate the respective elements with their Tracks.
To organize a scene using Tracks:
1. Create a new Track using the corresponding
button.
2. Give it a name that identifies its content.
3. Associate the object groups and keyframes with the
Track.
4. For scenes with multiple characters, create one
Track per character.
5. Use double-click on the Track to
quickly select its group and enter SpotLight Mode.
6. Add or remove points from Tracks as needed.
7. Use the selection of points of the Track to quickly
select related points.
8. Use these selections to facilitate animation
operations, such as interpolation.
Summary: Tracks are an organizational tool that allows separating groups of keyframes and points, facilitating the selection and editing of different parts of an animation.
Shortcuts organized by functional category. Where there was divergence between tutorials regarding the exact shortcut, both documented variants are listed.
| Shortcut | Action | Context |
|---|---|---|
| TAB | Toggles between View Mode and Edit Mode | General |
| Q (hold) | Isolates view/selection to only bones | Rigging |
| Alt + double-click | Activates Spotlight on the clicked object (or selected objects) | Selection |
| Shortcut | Action | Context |
|---|---|---|
| Double-click | Selects all points of the object | Selection |
| Shift + double-click | Selects object and sub-objects (children) | Selection |
| Ctrl + click | Adds to current selection | Selection |
| Ctrl + A | Selects all objects in the scene (except invisible ones) | Selection |
| Shift+Ctrl+A | Selects all objects in the scene (including invisible ones) | Selection |
| 1 | Activates point and object selection mode with the mouse | Selection |
| 2 | Activates scissors mode to add points to objects with the mouse | Selection |
| 3 | Activates eraser mode to remove points from objects with the mouse | Selection |
| 4 | Activates Keyframe Tool which also allows selecting points and objects, but modifies them for all frames when changed | Selection |
| Shift + 1 | Activates pointer selection mode (default mode) | Selection |
| Shift + 2 | Activates circular selection mode where everything within the circle around the mouse is selected | Selection |
| Shift + 3 | Activates circular selection with movement mode, where everything within the circle around the mouse is selected and immediately starts moving with the mouse cursor after clicking | Selection |
| Shortcut | Action | Context |
|---|---|---|
| + / - | Increases / decreases point size | Point Editing |
Ctrl + +
/ Ctrl +
- |
Increases / decreases transparency (alpha) | Point Editing |
| R | Rotation (uses mouse cursor position as pivot point) | Transformation |
| S | Proportional scale | Transformation |
| X | Horizontal scale | Transformation |
| Y | Vertical scale | Transformation |
| Shift + S | Proportional scale without deforming the outline | |
| Shift + X | Horizontal scale without deforming the outline | Transformation |
| Shift + Y | Vertical scale without deforming the outline | Transformation |
| Ctrl + P | Applies Freeze Textures to the selected points in the scene | Transformation |
| Ctrl + E | Opens/closes object path | Path Editing |
| Ctrl + K | Activates/deactivates manual editing of control points for an object’s point | Path Editing |
| * / Ctrl + * | Rotates texture (and reverse direction) | Fur / Brushes / Pens / Erasers |
| L | Gradually applies Linefy each time the key is pressed, making the curve between selected points increasingly straight | Transformation |
| Shift + L | Abruptly applies Linefy making the curve between selected points instantly straight | Transformation |
| Shortcut | Action | Context |
|---|---|---|
| Ctrl + J | Unites selected objects, meshes, brushes, or segments | Join / Merge |
| Ctrl + T | Converts brush stroke to fill object | Editing |
| Page Down | Sends object backward | Layers |
| Page Up | Sends object forward | |
| Ctrl + Page Down | Sends object all the way back | Layers |
| Ctrl + Page Up | Sends object all the way forward | Layers |
| Shift + Page Down | Sends object behind the last selected object | Layers |
| Shift + Page Up | Sends object in front of the last selected object | Layers |
| Ctrl + U | Simplifies selected objects and curves | Vectorization |
| Ctrl + L | Smooths selected objects and curves | Vectorization |
| Ctrl + C / Ctrl + X / Ctrl + V | Copies / cuts / pastes element | General Edit |
| Shortcut | Action | Context |
|---|---|---|
| Ctrl + B | Binds points/objects to a bone or defines hierarchy (parent) | Bones |
| Alt (hold) | Temporarily activates Inverse Kinematics (IK) | Bones / IK |
| Q(hold) | Isolates view/selection to only bones | Bones / IK |
| Shortcut | Action | Context |
|---|---|---|
| Ctrl + F2 | Creates a new keyframe | Timeline |
| F2 | Interpolates between selected keyframes | Timeline |
| Ctrl + Left/Right Arrow | Navigates between existing keyframes | Timeline |
| F6 | Resets/shows object from current frame to start | Visibility |
| F7 | Object appears on current frame (copies last state) | Visibility |
| F8 | Clears animation from current frame to end / Fix to Front | Visibility |
| Ctrl + F6 | Hides object from current frame to start | Visibility |
| Ctrl + F7 | Hides object on current frame to end | Visibility |
| Ctrl + F8 | Removes object until the end of the sequence | Visibility |
| Ctrl + drag (interval) | Selects a frame interval | Timeline |
| Alt + drag | Duplicates the selected interval | Timeline |
| Shift + Alt + drag | Moves the selected interval | Timeline |
| Shortcut | Action | Context |
|---|---|---|
| Ctrl + F5 | Follow Last Segment - links to the selected master segment | Procedural Rigging |
| Shift+Ctrl+F5) | Follow Parent Objects - links to the parent object | Procedural Rigging |
| Shift + F12 | Repeats the last color harmonization | Colors |